C3rd
RoundCube WebMail plugin: 2-Factor Authentication (2FA)
Posted: 26 Oct 2021, 21:50pm - TuesdayI was looking for a plugin to implement 2FA in my mail server. I found alexandregz/twofactor_gauthenticator but its quite outdated and quirky. Seems not maintained. So I forked it, the foundation is there and just need to improve it.
After few days of work, here's my improved 2FA for RoundCube webmail. Please feel free to use it and it works well with RoundCube v1.5.x
Git Repo: https://github.com/camilord/twofactor_gauthenticator
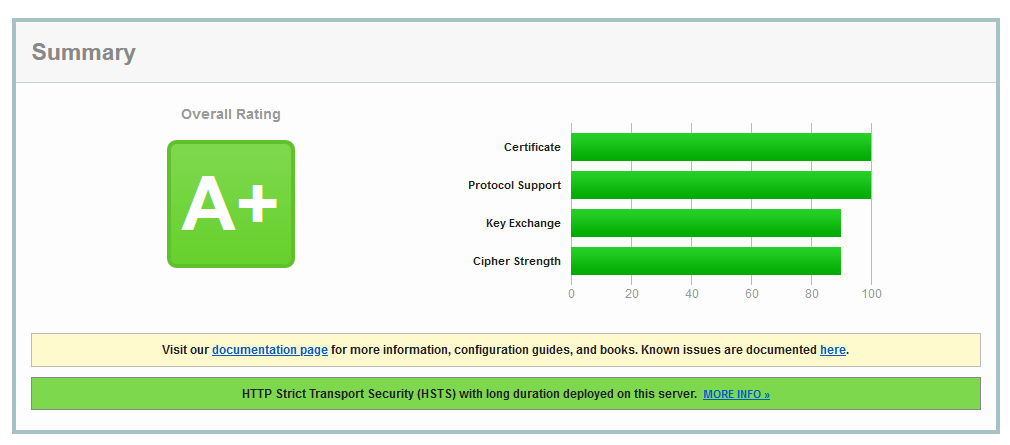
[ssllabs.com] How to get “A+” on SSL Server test as of "Feb 2021"
Posted: 23 Feb 2021, 5:02am - TuesdayIt's been a while I haven't checked my server with latest configuration with SSL stuff. When I did, I got B. So today, I make my SSL in my server great again! lol
So how I did it...
a2endmod headers
Make sure you enable the headers for the "Strict-Transport-Security"
Then next is edit your ssl.conf, currently my server is not Ubuntu 20.04LTS, not using CentOS 7.x anymore due to work related getting used to it. So in Ubuntu, the config file is located at: /etc/apache2/mods-available/ssl.conf
        #SSLCipherSuite HIGH:!aNULL
        SSLCipherSuite "EECDH+ECDSA+AESGCM EECDH+aRSA+AESGCM EECDH+ECDSA+SHA384 EECDH+ECDSA+SHA256 EECDH+aRSA+SHA384 EECDH+aRSA+SHA256 EECDH EDH+aRSA !CAMELLIA !SEED !3DES !RC4 !aNULL !eNULL !LOW !MD5 !EXP !PSK !SRP !DSS"

        #SSLProtocol all -SSLv3
        SSLProtocol TLSv1.2
        SSLCompression off
        SSLHonorCipherOrder on

        SSLUseStapling          on
        SSLStaplingResponderTimeout 5
        SSLStaplingReturnResponderErrors off
        SSLStaplingCache        shmcb:/var/run/ocsp(128000)

        # Header always set Strict-Transport-Security
        Header always set Strict-Transport-Security "max-age=15552000; includeSubDomains; preload"
So that's it, you'll get A+ for that coz I did! :) Cheers!
Implemented on my personal projects:
Bash: File Server Hourly Backup Script
Posted: 11 May 2016, 3:04am - Wednesday#!/bin/bash
cd /backup/
DATE=$(date "+%Y%m%d%H%M%S")
BACKUPNAME="jdrive_$DATE"
mkdir $BACKUPNAME
# find -mtime -1 | xargs cp -t --parents "$BACKUPNAME/"
find /jdrive/ -mmin -60 -exec cp --parents '{}' "$BACKUPNAME/" \;
tar -zcvf "ibackup/$BACKUPNAME.tar.gz" "$BACKUPNAME/"
rm -rf "$BACKUPNAME/"
# file and delete all files smaller than the specified filesize
find /backup/ibackup/ -name "*.gz" -size -500 -delete
# file and delete all files that are older than 45 days
find /backup/ibackup/ -mtime +45 -type f -exec rm -rf {} \;
Here you go... My home-brewed incremental backup script. We usually use duplicity but it failed us twice. So, we are using now both my home-brewed script and duplicity. Oh! by the way, I used this script for our file server only.Prendstah.com got A+ grade from ssllabs.com
Posted: 15 Dec 2014, 11:09am - Monday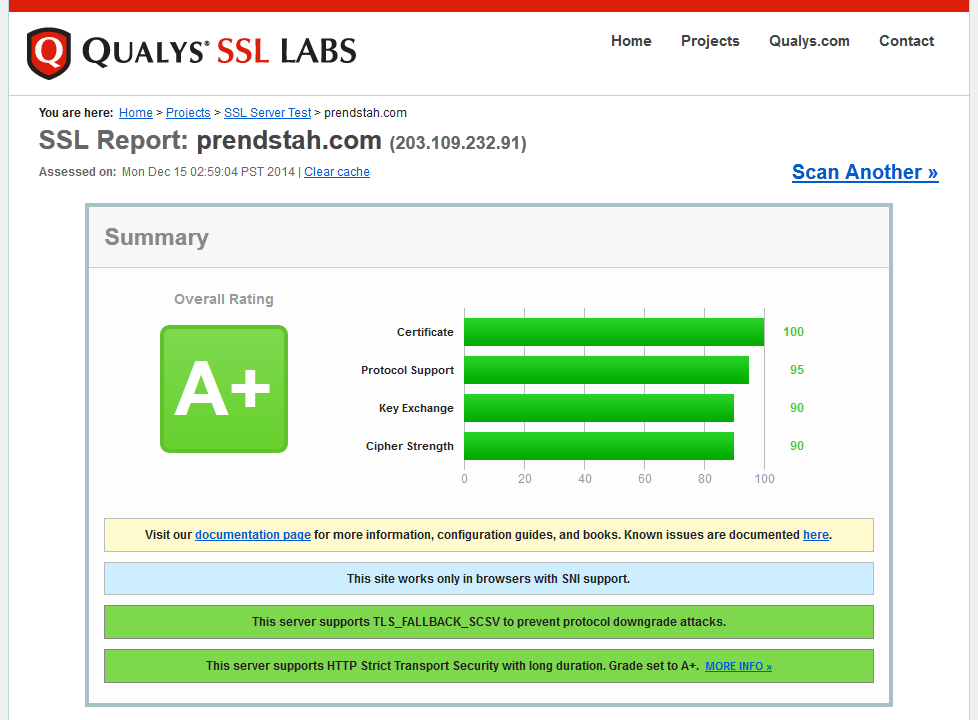
SSL Test: https://www.ssllabs.com/ssltest/analyze.html?d=prendstah.com

HyperTerminal
Posted: 11 Nov 2014, 5:47am - Tuesday
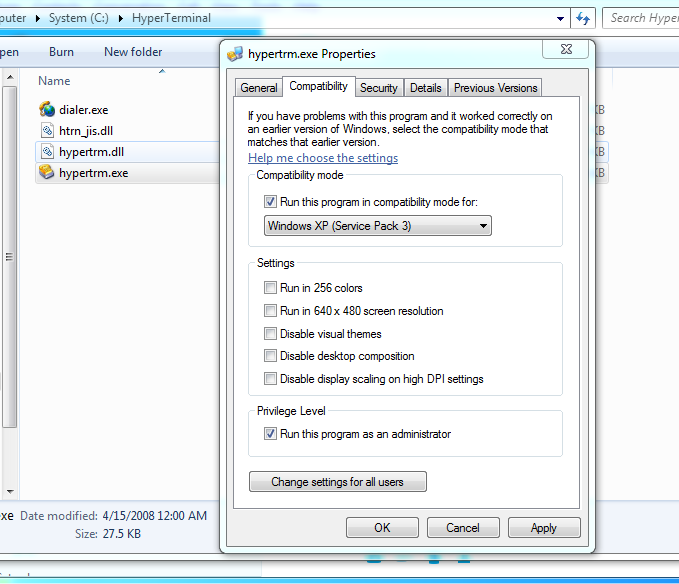
Download [download id="40"]
Allow postfix to send email with different sender from SMTP account
Posted: 2 Mar 2014, 23:17pm - Sundaypostfix/smtpd[27402]: NOQUEUE: reject: RCPT from unknown[125.123.123.100]: 553 5.7.1 <user@xxx.co.nz>: Sender address rejected: not owned by user user@xxx.co.nz; from=<xxx@xxx.co.nz> to=<xxx@gmail.com> proto=ESMTP helo=<localhost>Edit postfix configuration:
[root@mail ~]# nano /etc/postfix/main.cfChange from:
smtpd_sender_restrictions = permit_mynetworks, reject_sender_login_mismatch, permit_sasl_authenticatedTo:
smtpd_sender_restrictions = permit_mynetworks, permit_sasl_authenticatedThen restart postfix...
[root@mail ~]# postfix stop
postfix/postfix-script: stopping the Postfix mail system
postfix/postfix-script: waiting for the Postfix mail system to terminate
[root@mail ~]# postfix start
postfix/postfix-script: starting the Postfix mail system
[root@mail ~]#
That's it.. You can now change your from or reply-to in your PHPMailer. :) Hope this helps...
Installing subversion in CentOS
Posted: 4 Aug 2012, 22:31pm - SaturdaySubversion (SVN) is a version control system. This post looks at how to install subversion on CentOS (the process is similar for other Linux distros) and the setting up a repository. To install subversion on CentOS you need to have the RMForge custom repository enabled, and then issue the following command:
yum -y install subversionThis will check for any dependencies and then prompt you to install those and subversion itself. Type in "y" and <enter> to install these. Unfortunately it doesn't set up anything else after installing the necessary files, so you need to add a subversion user and set up the repositories etc yourself. If we decide to call the subversion user "svn" then you add them like so:
useradd svn
passwd svn
And then change to the subversion user like so:
su svnChange to the svn user's directory and then create a "repositories" directory like so:
cd
mkdir repositories
And now create your project's repository. For example, if we had a project called "myproject" you would do this:
cd repositories
svnadmin create myproject
There will now be a "myproject" directory containing the following:
-rw-rw-r-- 1 svn svn  229 Nov 21 16:58 README.txt
drwxrwxr-x 2 svn svn 1024 Nov 21 16:58 conf
drwxrwsr-x 6 svn svn 1024 Nov 21 16:58 db
-r--r--r-- 1 svn svn    2 Nov 21 16:58 format
drwxrwxr-x 2 svn svn 1024 Nov 21 16:58 hooks
drwxrwxr-x 2 svn svn 1024 Nov 21 16:58 locks
You need to edit "myproject/conf/svnserve.conf" and uncomment the following lines:
auth-access = write
password-db = passwd
and edit the password file "myproject/conf/passwd" adding a new user and password. Note that the password is stored in plain text. In the following example we have a user called "john" whose password is "foobar123":
[users]
john = foobar123
And finally, as the svn user, start the subversion daemon like so:
svnserve -d -r /home/svn/repositoriesYou can now connect to the subversion repository at e.g. svn://svn@hostname/myproject You can add additional repositories under this user using the "svnadmin create" command and then access them at svn://[userame]@[hostname]/[project name] You can use tortoiseSVN as client.
PHP Warning: PHP Startup: Unable to load dynamic library '/usr/lib64/php/modules/mcrypt.so' - libmcrypt.so.4: cannot open shared object file: No such file or directory in Unknown on line 0
Posted: 7 May 2012, 23:34pm - Monday[root@mail lib64]# php -v
PHP Warning: PHP Startup: Unable to load dynamic library '/usr/lib64/php/modules/mcrypt.so' - libmcrypt.so.4: cannot open shared object file: No such file or directory in Unknown on line 0
PHP 5.3.3 (cli) (built: Feb 2 2012 23:47:49)
Copyright (c) 1997-2010 The PHP Group
Zend Engine v2.3.0, Copyright (c) 1998-2010 Zend Technologies
with the ionCube PHP Loader v4.0.10, Copyright (c) 2002-2011, by ionCube Ltd.
If there's PHP Warning, then that means there are missing files... if more warnings, probably there's a problem during installation of your php. But in this guide, I will only discuss how to fix the php-mcrypt issues.
First download the lacking files, which are;
- libmcrypt-2.5.8-4.el5.centos.x86_64.rpm
- php-mcrypt-5.3.3-1.el6.x86_64.rpm
[root@mail ~]# rpm2cpio libmcrypt-2.5.8-4.el5.centos.x86_64.rpm | cpio -idmv
[root@mail ~]# rpm2cpio php-mcrypt-5.3.3-1.el6.x86_64.rpm | cpio -idmv
Then move the files that you just extracted to /usr/lib64 and after moving the files, restart httpd and cast again the php -v.
[root@mail ~]# php -v
PHP 5.3.3 (cli) (built: Feb  2 2012 23:47:49)
Copyright (c) 1997-2010 The PHP Group
Zend Engine v2.3.0, Copyright (c) 1998-2010 Zend Technologies
    with the ionCube PHP Loader v4.0.10, Copyright (c) 2002-2011, by ionCube Ltd.
[root@mail ~]#
This is the output you should get, no PHP Warnings and php-mcrypt should be working fine. That's it! Happy solving!Outsourcing in the Philippines: InnerMax Support
Posted: 22 Dec 2011, 17:20pm - Thursday- Innermax Support provides high quality services
- Takes your business outsourcing to a new level with more leads and sales
- Endows with the best services way beyond your desired results and expectations
- Has assigned the best agents that fit every campaign you asked to be dealt with.
- Gladly welcomes high level of engagement with the corporate stakeholders at your company.
Expect Quality Services
- Exceptional results and return on assets
- They never fail to keep our eyes peeled towards particular outcomes and circumstances of your campaign and in most instances; they most likely notice any sorts of any diversities and take action before such gets out of hand.
- They are firmly committed to quality service and accommodation.
- They are very knowledgeable by every inch and corners from tiniest to most immense aspects about e- marketing.
- They never would hesitate to establish bountiful relationship and develop harmonious companionship with their valuable clients.
- They live by the virtue of courteous and respectful demeanor to each of their clients.
- They never would leave their clients oblivious about any current status of the relayed tasks.
- And above all. They walk what they talk.
VM: Resize Partition on a running system
Posted: 20 Sep 2021, 22:09pm - MondayI was stuck for a while how to resize a running partition in my VM. Been searching for answers and all answers are quite long except this one:
root@silex5:~# df -h
Filesystem      Size  Used Avail Use% Mounted on
udev            3.9G     0  3.9G   0% /dev
tmpfs           798M  1.1M  797M   1% /run
/dev/sda2        49G   32G   15G  69% /
tmpfs           3.9G     0  3.9G   0% /dev/shm
tmpfs           5.0M     0  5.0M   0% /run/lock
tmpfs           3.9G     0  3.9G   0% /sys/fs/cgroup
/dev/loop0      100M  100M     0 100% /snap/core/11420
/dev/loop1       18M   18M     0 100% /snap/pdftk/9
/dev/loop2      100M  100M     0 100% /snap/core/11606
tmpfs           798M     0  798M   0% /run/user/1011

root@silex5:~# growpart /dev/sda 2
CHANGED: partition=2 start=4096 old: size=104851456 end=104855552 new: size=251654111,end=251658207

root@silex5:~# resize2fs /dev/sda2
resize2fs 1.44.1 (24-Mar-2018)
Filesystem at /dev/sda2 is mounted on /; on-line resizing required
old_desc_blocks = 7, new_desc_blocks = 15
The filesystem on /dev/sda2 is now 31456763 (4k) blocks long.

root@silex5:~# df -h
Filesystem      Size  Used Avail Use% Mounted on
udev            3.9G     0  3.9G   0% /dev
tmpfs           798M  1.1M  797M   1% /run
/dev/sda2       118G   32G   81G  29% /
tmpfs           3.9G     0  3.9G   0% /dev/shm
tmpfs           5.0M     0  5.0M   0% /run/lock
tmpfs           3.9G     0  3.9G   0% /sys/fs/cgroup
/dev/loop0      100M  100M     0 100% /snap/core/11420
/dev/loop1       18M   18M     0 100% /snap/pdftk/9
/dev/loop2      100M  100M     0 100% /snap/core/11606
tmpfs           798M     0  798M   0% /run/user/1011
root@silex5:~# reboot
Reference: https://unix.stackexchange.com/questions/137482/how-to-to-resize-an-ext4-partition-from-the-command-line
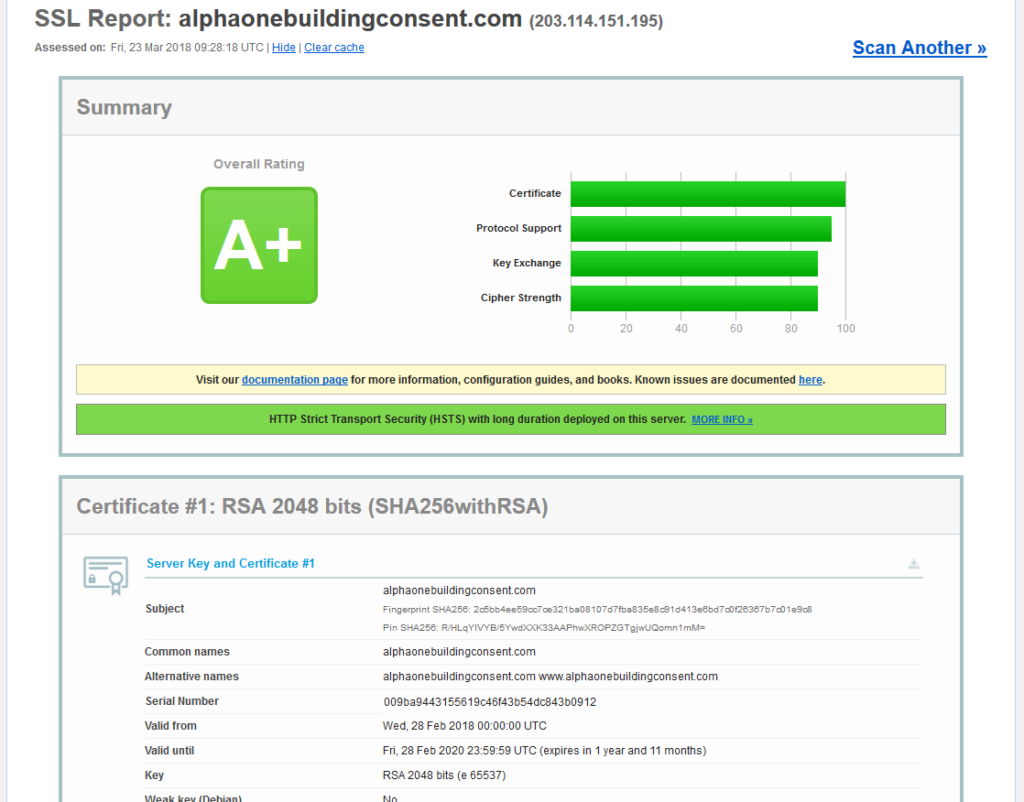
[ssllabs.com] How to get "A+" on SSL Server test
Posted: 23 Mar 2018, 9:38am - FridaySSLProtocol all -SSLv2 -SSLv3 SSLHonorCipherOrder onThen save your changes and restart your Apache. That's it! You should get an A+ for that. Note: It was just recently that you have to turn on that SSLHonorCipherOrder or "Apache for Forward Secrecy" to ON. Reference: https://www.digicert.com/ssl-support/ssl-enabling-perfect-forward-secrecy.htm
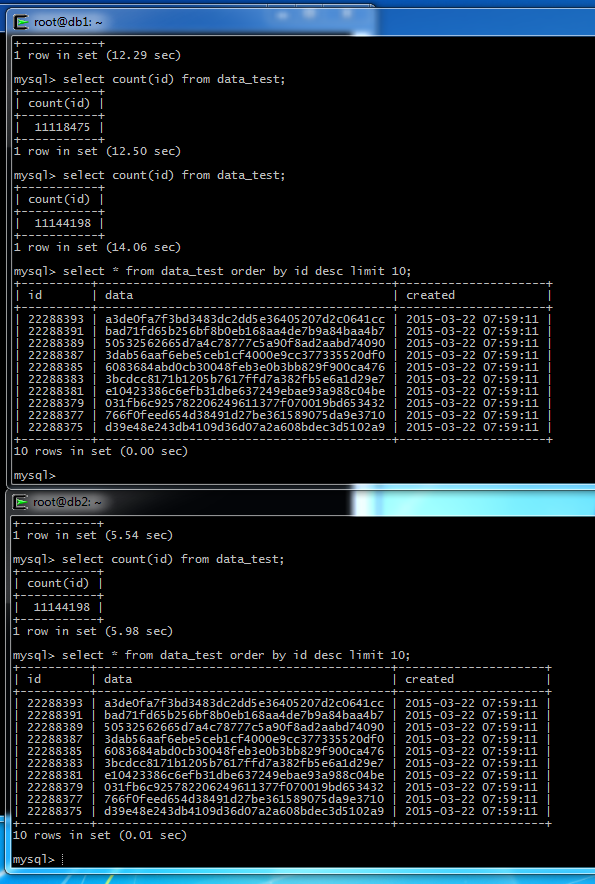
MySQL + Percona XtraDB Cluster 5.6
Posted: 21 Mar 2015, 21:02pm - Saturdayroot@db1:~# apt-key adv --keyserver keys.gnupg.net --recv-keys 1C4CBDCDCD2EFD2AOne thing you need to ensure is you have all Ubuntu official repositories plus Percona APT repository. So what I did is replace /etc/apt/source.list with:
# deb cdrom:[Ubuntu-Server 14.04.2 LTS _Trusty Tahr_ - Release i386 (20150218.1)]/ trusty main restricted

###### Ubuntu Main Repos
deb http://us.archive.ubuntu.com/ubuntu/ trusty main restricted universe multiverse
deb-src http://us.archive.ubuntu.com/ubuntu/ trusty main restricted universe multiverse

## Ubuntu Security Updates
deb http://security.ubuntu.com/ubuntu trusty-security main
deb-src http://security.ubuntu.com/ubuntu trusty-security main
deb http://security.ubuntu.com/ubuntu trusty-security universe
deb-src http://security.ubuntu.com/ubuntu trusty-security universe
deb http://security.ubuntu.com/ubuntu trusty-security multiverse
deb-src http://security.ubuntu.com/ubuntu trusty-security multiverse

## Uncomment the following two lines to add software from Canonical's
## 'partner' repository.
## This software is not part of Ubuntu, but is offered by Canonical and the
## respective vendors as a service to Ubuntu users.
deb http://archive.canonical.com/ubuntu trusty partner
deb-src http://archive.canonical.com/ubuntu trusty partner

## Uncomment the following two lines to add software from Ubuntu's
## 'extras' repository.
## This software is not part of Ubuntu, but is offered by third-party
## developers who want to ship their latest software.
deb http://extras.ubuntu.com/ubuntu trusty main
deb-src http://extras.ubuntu.com/ubuntu trusty main

###### Ubuntu Update Repos
deb http://us.archive.ubuntu.com/ubuntu/ trusty-security main restricted universe multiverse
deb http://us.archive.ubuntu.com/ubuntu/ trusty-updates main restricted universe multiverse
deb http://us.archive.ubuntu.com/ubuntu/ trusty-backports main restricted universe multiverse
deb-src http://us.archive.ubuntu.com/ubuntu/ trusty-security main restricted universe multiverse
deb-src http://us.archive.ubuntu.com/ubuntu/ trusty-updates main restricted universe multiverse
deb-src http://us.archive.ubuntu.com/ubuntu/ trusty-backports main restricted universe multiverse

# Percona XtraDB Cluster
deb http://repo.percona.com/apt trusty main
deb-src http://repo.percona.com/apt trusty main
After updating the APT source list, execute:
root@db1:~# apt-get updateAfter that, you can install Percona XtraDB Cluster server and client packages:
root@db1:~# apt-get install percona-server-server-5.6 percona-server-client-5.6This is where I got stuck when trying to connect the nodes. Remove apparmor!!! You can check first if apparmor is running:
root@db1:~# apparmor_statusIf its running, remove it before causing problems to Percona.
root@db1:~# apt-get remove apparmorImportant Notes: Do the same installation in the 2nd node or DB2. Then to run the primary node (donor), DB1 in our case:
root@db1:~# service mysql bootstrap-pxc
 * Bootstrapping Percona XtraDB Cluster database server mysqld                       [ OK ]
root@db1:~#
Then run the 2nd node or joiner (DB2):
root@db2:~# service mysql start
mysql start/running, process 1550
root@db2:~#
~ or ~
root@db2:~# service mysql restart
mysql stop/waiting
mysql start/running, process 1550
root@db2:~#
Note: Always start first the primary node (DB1) then the next node (DB2) Testing Check if primary node (DB1) is working...
root@db1:~# mysql -u root -p -e "show status where Variable_name like '%wsrep_cluster%' OR Variable_name like '%wsrep_ready%';"
Enter password:
+--------------------------+--------------------------------------+
| Variable_name            | Value                                |
+--------------------------+--------------------------------------+
| wsrep_cluster_conf_id    | 5                                    |
| wsrep_cluster_size       | 1                                    |
| wsrep_cluster_state_uuid | 1fa1e1fc-cf8e-11e4-9664-3ea415c4a429 |
| wsrep_cluster_status     | Primary                              |
| wsrep_ready              | ON                                   |
+--------------------------+--------------------------------------+

root@db1:~# mysql -u root -p -e "show binary logs;"
Enter password:
+------------------+-----------+
| Log_name         | File_size |
+------------------+-----------+
| mysql-bin.000001 |       120 |
+------------------+-----------+
Next, check the 2nd node (DB2)...
root@db2:/etc/mysql# mysql -u root -p
Enter password:
Welcome to the MySQL monitor.  Commands end with ; or \g.
Your MySQL connection id is 7
Server version: 5.6.22-72.0-56-log Percona XtraDB Cluster (GPL), Release rel72.0, Revision 978, WSREP version 25.8, wsrep_25.8.r4150

Copyright (coffee) 2009-2014 Percona LLC and/or its affiliates
Copyright (coffee) 2000, 2014, Oracle and/or its affiliates. All rights reserved.

Oracle is a registered trademark of Oracle Corporation and/or its
affiliates. Other names may be trademarks of their respective
owners.

Type 'help;' or '\h' for help. Type '\c' to clear the current input statement.

mysql>
More TEST: I created a PHP script for DB1 and DB2 to test the replication. DB1 PHP Script (test_percona.php):
<?php

$connect = mysql_connect('localhost','root','secret');

mysql_select_db('test', $connect);

// insert if table not exists...
@mysql_query("create table if not exists data_test(
 id bigint(20) unsigned not null auto_increment primary key,
 data varchar(128),
 created datetime
);");

// inject data infinitely
while (true) {
        $data = sha1(time().rand(100,99999));
        echo $data." -> ".date("j M Y g:i.s a - l\n");
        @mysql_query("INSERT INTO data_test (data,created) VALUES ('".$data."', NOW())");
}

?>
DB2 PHP Script (monitor_percona.php):
<?php

$connect = mysql_connect('localhost','root','secret');

mysql_select_db('test', $connect);

$last_id = 0;

while (true) {
        $result = mysql_query("SELECT * FROM data_test WHERE id > ".$last_id." ORDER BY id ASC");
        $max = mysql_num_rows($result);
        if ($max > 0) {
                for ($i = 0; $i < $max; $i++) {
                        echo mysql_result($result,$i,"data")." -> ".date("j M Y g:i.s a - l", strtotime(mysql_result($result,$i,"created")))."\n";
                        $last_id = mysql_result($result,$i,"id");
                }
        }
}

?>
Then you can run the script on both nodes. To run in DB1 node, do:
root@db1:~# php test_percona.phpThen for the 2nd node:
root@db2:~# php monitor_percona.phpAfter that, you must see same output both nodes.

 Encountered Issues (tail -f /var/log/mysql/error.log):
2015-03-21 20:19:11 6613 [Warning] WSREP: Gap in state sequence. Need state transfer.
2015-03-21 20:19:11 6613 [Note] WSREP: Running: 'wsrep_sst_xtrabackup-v2 --role 'joiner' --address '192.168.9.103' --auth 'sstuser:secret' --datadir '/var/lib/mysql/' --defaults-file '/etc/mysql/my.cnf' --parent '6613'  '' '
2015-03-21 20:19:11 6613 [ERROR] execlp() failed: Permission denied
2015-03-21 20:19:11 6613 [ERROR] WSREP: Failed to read 'ready <addr>' from: wsrep_sst_xtrabackup-v2 --role 'joiner' --address '192.168.9.103' --auth 'sstuser:secret' --datadir '/var/lib/mysql/' --defaults-file '/etc/mysql/my.cnf' --parent '6613'  '' Read: '(null)'
2015-03-21 20:19:11 6613 [ERROR] WSREP: Process completed with error: wsrep_sst_xtrabackup-v2 --role 'joiner' --address '192.168.9.103' --auth 'sstuser:secret' --datadir '/var/lib/mysql/' --defaults-file '/etc/mysql/my.cnf' --parent '6613'  '' : 1 (Operation not permitted)
2015-03-21 20:19:11 6613 [ERROR] WSREP: Failed to prepare for 'xtrabackup-v2' SST. Unrecoverable.
2015-03-21 20:19:11 6613 [ERROR] Aborting
To solve the issue is to remove the apparmor --- Reference:
- http://www.percona.com/doc/percona-server/5.6/installation/apt_repo.html
- http://www.percona.com/doc/percona-xtradb-cluster/5.5/howtos/ubuntu_howto.html
- http://www.percona.com/doc/percona-xtrabackup/2.1/innobackupex/pit_recovery_ibk.html
CentOS 7: Enable Apache UserDIR
Posted: 10 Dec 2014, 20:16pm - Wednesdaynano /etc/httpd/conf.d/userdir.confChange from:
<IfModule mod_userdir.c>
    #
    # UserDir is disabled by default since it can confirm the presence
    # of a username on the system (depending on home directory
    # permissions).
    #
    UserDir disabled

    #
    # To enable requests to /~user/ to serve the user's public_html
    # directory, remove the "UserDir disabled" line above, and uncomment
    # the following line instead:
    #
    UserDir public_html

</IfModule>

<Directory /home/*/public_html>
        Options Indexes Includes FollowSymLinks
         Require all granted
</Directory>
To:
<IfModule mod_userdir.c>
    #
    # UserDir is disabled by default since it can confirm the presence
    # of a username on the system (depending on home directory
    # permissions).
    #
    #UserDir disabled

    #
    # To enable requests to /~user/ to serve the user's public_html
    # directory, remove the "UserDir disabled" line above, and uncomment
    # the following line instead:
    #
    UserDir public_html

</IfModule>

<Directory /home/*/public_html>
        Options Indexes Includes FollowSymLinks
         Require all granted
</Directory>
Then restart apache...
systemctl restart httpd.serviceThen create user's public_html and its permissions (in my case, my user is prendstah):
mkdir /home/prendstah/public_html
chmod 711 /home/prendstah
chown prendstah:prendstah /home/prendstah/public_html
chmod 755 /home/prendstah/public_html
Then here's the other new things, especially you are using SELinux
setsebool -P httpd_enable_homedirs true
chcon -R -t httpd_sys_content_t /home/prendstah/public_html
That's it.. That should give you a user directory a public access.
HowTo: Fortune & Cowsay
Posted: 2 Apr 2014, 20:59pm - Wednesday
root@mojo:~# apt-get install -y fortune cowsayThen add the commands to your PATH
root@mojo:~# cd ~
root@mojo:~# nano .profile
or
root@mojo:~# cd ~
root@mojo:~# nano .bash_profile
Add the following to the end of the file (be sure its the right path for fortune and cowsay):
PATH=$PATH:/usr/games
export PATH
Save and exit. Next edit your .bashrc
root@mojo:~# cd ~
root@mojo:~# nano .bashrc
Add the the following lines to the end of the file...
fortune | cowsay -dor if you don't want to set the PATH, simply edit your .bashrc and at the end of the file, add this line:
/usr/games/fortune | /usr/games/cowsay -dThat's it... log off and log in again. Open your terminal, you'll have your cow greetings. In case you get an error like you cant locate fortune or fortune-mod or cowsay (most likely you will encounter this if you install your OS offline), update your source.list.
root@mojo: ~# nano /etc/apt/source.listthen replace the source with the following:
## Regular repositories
deb http://http.kali.org/kali kali main non-free contrib
deb http://security.kali.org/kali-security kali/updates main contrib non-free
## Source repositories
deb-src http://http.kali.org/kali kali main non-free contrib
deb-src http://security.kali.org/kali-security kali/updates main contrib non-free
then do the update and upgrade...
apt-get clean
apt-get update
apt-get upgrade
I think that would solve the problem...
HowTo: iRedMail 0.8.6
Posted: 24 Feb 2014, 4:14am - Monday- Install iRedMail
- Disable Greylisting
- Enable Catch-All
- Email Forwarder
tar -xvjf iRedMail-0.8.6.tar.bz2

cd iRedMail-0.8.6

bash iRedMail.sh
Just follow the wizard installation and after installation, do the following commands: (just some few fixes)
ln -s /etc/amavisd/amavisd.conf /etc/amavisd.conf

amavisd showkeys
Add the DKIM keys to your DNS and configure SPF too then you may test by casting the commands below; Refer to:
- http://code.google.com/p/iredmail/wiki/DNS_SPF
- http://code.google.com/p/iredmail/wiki/DNS_DKIM
amavisd testkeysAfter reboot, we will now disable greylisting.
nano /etc/policyd/cluebringer.confChange from:
# Access Control module
[AccessControl]
enable=1

# Greylisting module
[Greylisting]
enable=1

# CheckHelo module
[CheckHelo]
enable=1

# CheckSPF module
[CheckSPF]
enable=1

# Quotas module
[Quotas]
enable=1
to:
# Access Control module
[AccessControl]
enable=1

# Greylisting module
[Greylisting]
enable=0

# CheckHelo module
[CheckHelo]
enable=1

# CheckSPF module
[CheckSPF]
enable=1

# Quotas module
[Quotas]
enable=1
Then reboot your server. (Don't know how to restart the policyd) hehehe.. Next is enable the Catch-All;
nano /etc/postfix/mysql/domain_alias_catchall_maps.cfChange from:
query = SELECT alias.goto FROM alias,alias_domain,domain WHERE alias_domain.alias_domain='%d' AND alias.address=CONCAT('%u', '@', alias_domain.target_domain) AND alias_domain.target_domain=domain.domain AND alias.active=1 AND alias_domain.active=1 AND domain.backupmx=0
to:
query = SELECT alias.goto FROM alias,alias_domain,domain WHERE alias_domain.alias_domain='%d' AND (alias.address=CONCAT('%u', '@', alias_domain.target_domain) OR alias.address=CONCAT('@', alias_domain.target_domain)) AND alias_domain.target_domain=domain.domain AND alias.active=1 AND alias_domain.active=1 AND domain.backupmx=0
Save then restart postfix;
postfix stop

postfix start
Now catch-all is now enable in postfix. Next thing is add which domain to catch-all and where to go. Login to MySQL as root, use vmail database and add to the following rows to alias table.
INSERT INTO alias (address, goto, domain) VALUES ('@sample.co.nz', 'user@sample.co.nz', 'sample.co.nz');

INSERT INTO alias (address, goto, domain) VALUES ('@test.sample.co.nz', 'user@sample.co.nz', 'test.sample.co.nz');
Aside from catch all, you can setup the email forwarder too;
INSERT INTO alias (address, goto, domain) VALUES ('info@sample.co.nz', 'user@sample.co.nz', 'sample.co.nz');
All done.. its self explanatory... Hehehe...
Hope this helps.
Some Reference:
Centos 6.2: PHP, MySQL and Nginx
Posted: 21 Jun 2012, 15:53pm - Thursday[root@server ~]# wget http://ftp.jaist.ac.jp/pub/Linux/Fedora/epel/6/i386/epel-release-6-7.noarch.rpm [root@server ~]# rpm -ivh epel-release-6-7.noarch.rpm [root@server nginx]# yum repolist Loaded plugins: fastestmirror, protectbase, security Loading mirror speeds from cached hostfile * base: centos.ipserverone.com * epel: ftp.cuhk.edu.hk * extras: centos.ipserverone.com * updates: centos.ipserverone.com 0 packages excluded due to repository protections repo id repo name status base CentOS-6 - Base 6,294 epel Extra Packages for Enterprise Linux 6 - x86_64 7,561 extras CentOS-6 - Extras 6 nginx nginx repo 23 updates CentOS-6 - Updates 1,147 repolist: 15,031Then install nginx.
[root@server ~]# yum -y install nginxInstall PHP, MySQL and other packages.
[root@server ~]# yum -y install php-pear-Net-Socket php-pear php-common php-gd php-devel php php-mbstring php-pear-Mail php-cli php-imap php-snmp php-pdo php-xml php-pear-Auth-SASL php-ldap php-pear-Net-SMTP php-mysqlInstall spawn-fgi
[root@server ~]# yum -y install spawn-fcgiDownload and setup the spawn-fcgi to init.d ([download id="32"])
[root@server ~]# wget http://bash.cyberciti.biz/dl/419.sh.zip
[root@server ~]# unzip 419.sh.zip
[root@server ~]# mv 419.sh /etc/init.d/php_cgi
[root@server ~]# chmod +x /etc/init.d/php_cgi
Start PHP app server and check if running
[root@server ~]# /etc/init.d/php_cgi start
[root@server ~]# netstat -tulpn | grep :9000
tcp        0      0 127.0.0.1:9000              0.0.0.0:*                   LISTEN      1843/php-cgi
Configure nginx.conf for PHP based webserver for Wordpress, Drupal & Joomla (Download: [download id="33"]).
[root@server nginx]# cat nginx.conf

user  nginx;
worker_processes  1;

error_log  /var/log/nginx/error.log warn;
pid        /var/run/nginx.pid;

events {
    worker_connections  1024;
}

http {
    include       /etc/nginx/mime.types;
    default_type  application/octet-stream;

    log_format  main  '$remote_addr - $remote_user [$time_local] "$request" '
                      '$status $body_bytes_sent "$http_referer" '
                      '"$http_user_agent" "$http_x_forwarded_for"';

    access_log  /var/log/nginx/access.log  main;

    sendfile        on;
    #tcp_nopush     on;

    keepalive_timeout  65;

    #gzip  on;

    include /etc/nginx/conf.d/*.conf;

    server {
        listen 80 default_server;
        server_name .nginx.ph;
        access_log /var/log/nginx/nginx.ph_access_log;
        error_log /var/log/nginx/nginx.ph_error_log;

        index index.html index.php index.htm;

        root /home/camilord/public_html;

        location / {
           # if you're just using wordpress and don't want extra rewrites
           # then replace the word @rewrites with /index.php
           try_files $uri $uri/ @rewrites;
        }

        location @rewrites {
           # Can put some of your own rewrite rules in here
           # for example rewrite ^/~(.*)/(.*)/? /users/$1/$2 last;
           # If nothing matches we'll just send it to /index.php
           rewrite ^ /index.php last;
        }

        # This block will catch static file requests, such as images, css, js
        # The ?: prefix is a 'non-capturing' mark, meaning we do not require
        # the pattern to be captured into $1 which should help improve performance
        location ~* \.(?:ico|css|js|gif|jpe?g|png)$ {
                # Some basic cache-control for static files to be sent to the browser
                expires max;
                add_header Pragma public;
                add_header Cache-Control "public, must-revalidate, proxy-revalidate";
        }

        # remove the robots line if you want to use wordpress' virtual robots.txt
        location = /robots.txt  { access_log off; log_not_found off; }
        location = /favicon.ico { access_log off; log_not_found off; }

        # this prevents hidden files (beginning with a period) from being served
        location ~ /\.          { access_log off; log_not_found off; deny all; }

        location ~ \.php {
                fastcgi_param  QUERY_STRING       $query_string;
                fastcgi_param  REQUEST_METHOD     $request_method;
                fastcgi_param  CONTENT_TYPE       $content_type;
                fastcgi_param  CONTENT_LENGTH     $content_length;

                fastcgi_param  SCRIPT_NAME        $fastcgi_script_name;
                fastcgi_param  SCRIPT_FILENAME    $document_root$fastcgi_script_name;
                fastcgi_param  REQUEST_URI        $request_uri;
                fastcgi_param  DOCUMENT_URI       $document_uri;
                fastcgi_param  DOCUMENT_ROOT      $document_root;
                fastcgi_param  SERVER_PROTOCOL    $server_protocol;

                fastcgi_param  GATEWAY_INTERFACE  CGI/1.1;
                fastcgi_param  SERVER_SOFTWARE    nginx;

                fastcgi_param  REMOTE_ADDR        $remote_addr;
                fastcgi_param  REMOTE_PORT        $remote_port;
                fastcgi_param  SERVER_ADDR        $server_addr;
                fastcgi_param  SERVER_PORT        $server_port;
                fastcgi_param  SERVER_NAME        $server_name;

                fastcgi_pass 127.0.0.1:9000;
        }

       #location ~ \.php$
       #{
       #    root           html;
       #    fastcgi_pass   127.0.0.1:9000;
       #    fastcgi_index  index.php;
       #    fastcgi_param  SCRIPT_FILENAME  /usr/share/nginx/html$fastcgi_script_name;
       #    include        fastcgi_params;
       #}
    }
}
Restart Nginx
[root@server ~]# service nginx restartI think that's it.. it should be working because its working on my CentOS linux box. :) Reference:
- http://www.cyberciti.biz/faq/rhel-fedora-install-configure-nginx-php5/
- http://www.cyberciti.biz/faq/rhel-fedora-centos-linux-enable-epel-repo/
- http://www.thegeekstuff.com/2012/06/enable-epel-repository/
- http://ftp.jaist.ac.jp/pub/Linux/Fedora/epel/6/i386/repoview/epel-release.html
- http://wiki.nginx.org/ServerBlockExample
- http://kbeezie.com/view/nginx-configuration-examples/
Securing Web Folders
Posted: 27 Apr 2012, 2:23am - FridayAuthType Basic
AuthName "Members Only"
AuthUserFile /home/user/public_html/secretfolder/.htpasswd
<limit GET PUT POST>
require valid-user
</limit>
then execute the htpasswd command;
htpasswd -c /home/user/public_html/secretfolder/.htpasswd adminThat's it.. if you visit http://servername.com/~user/secretfolder/ -- it will prompt a username and password. So you have to enter admin as username and the password you entered. Enjoy~!
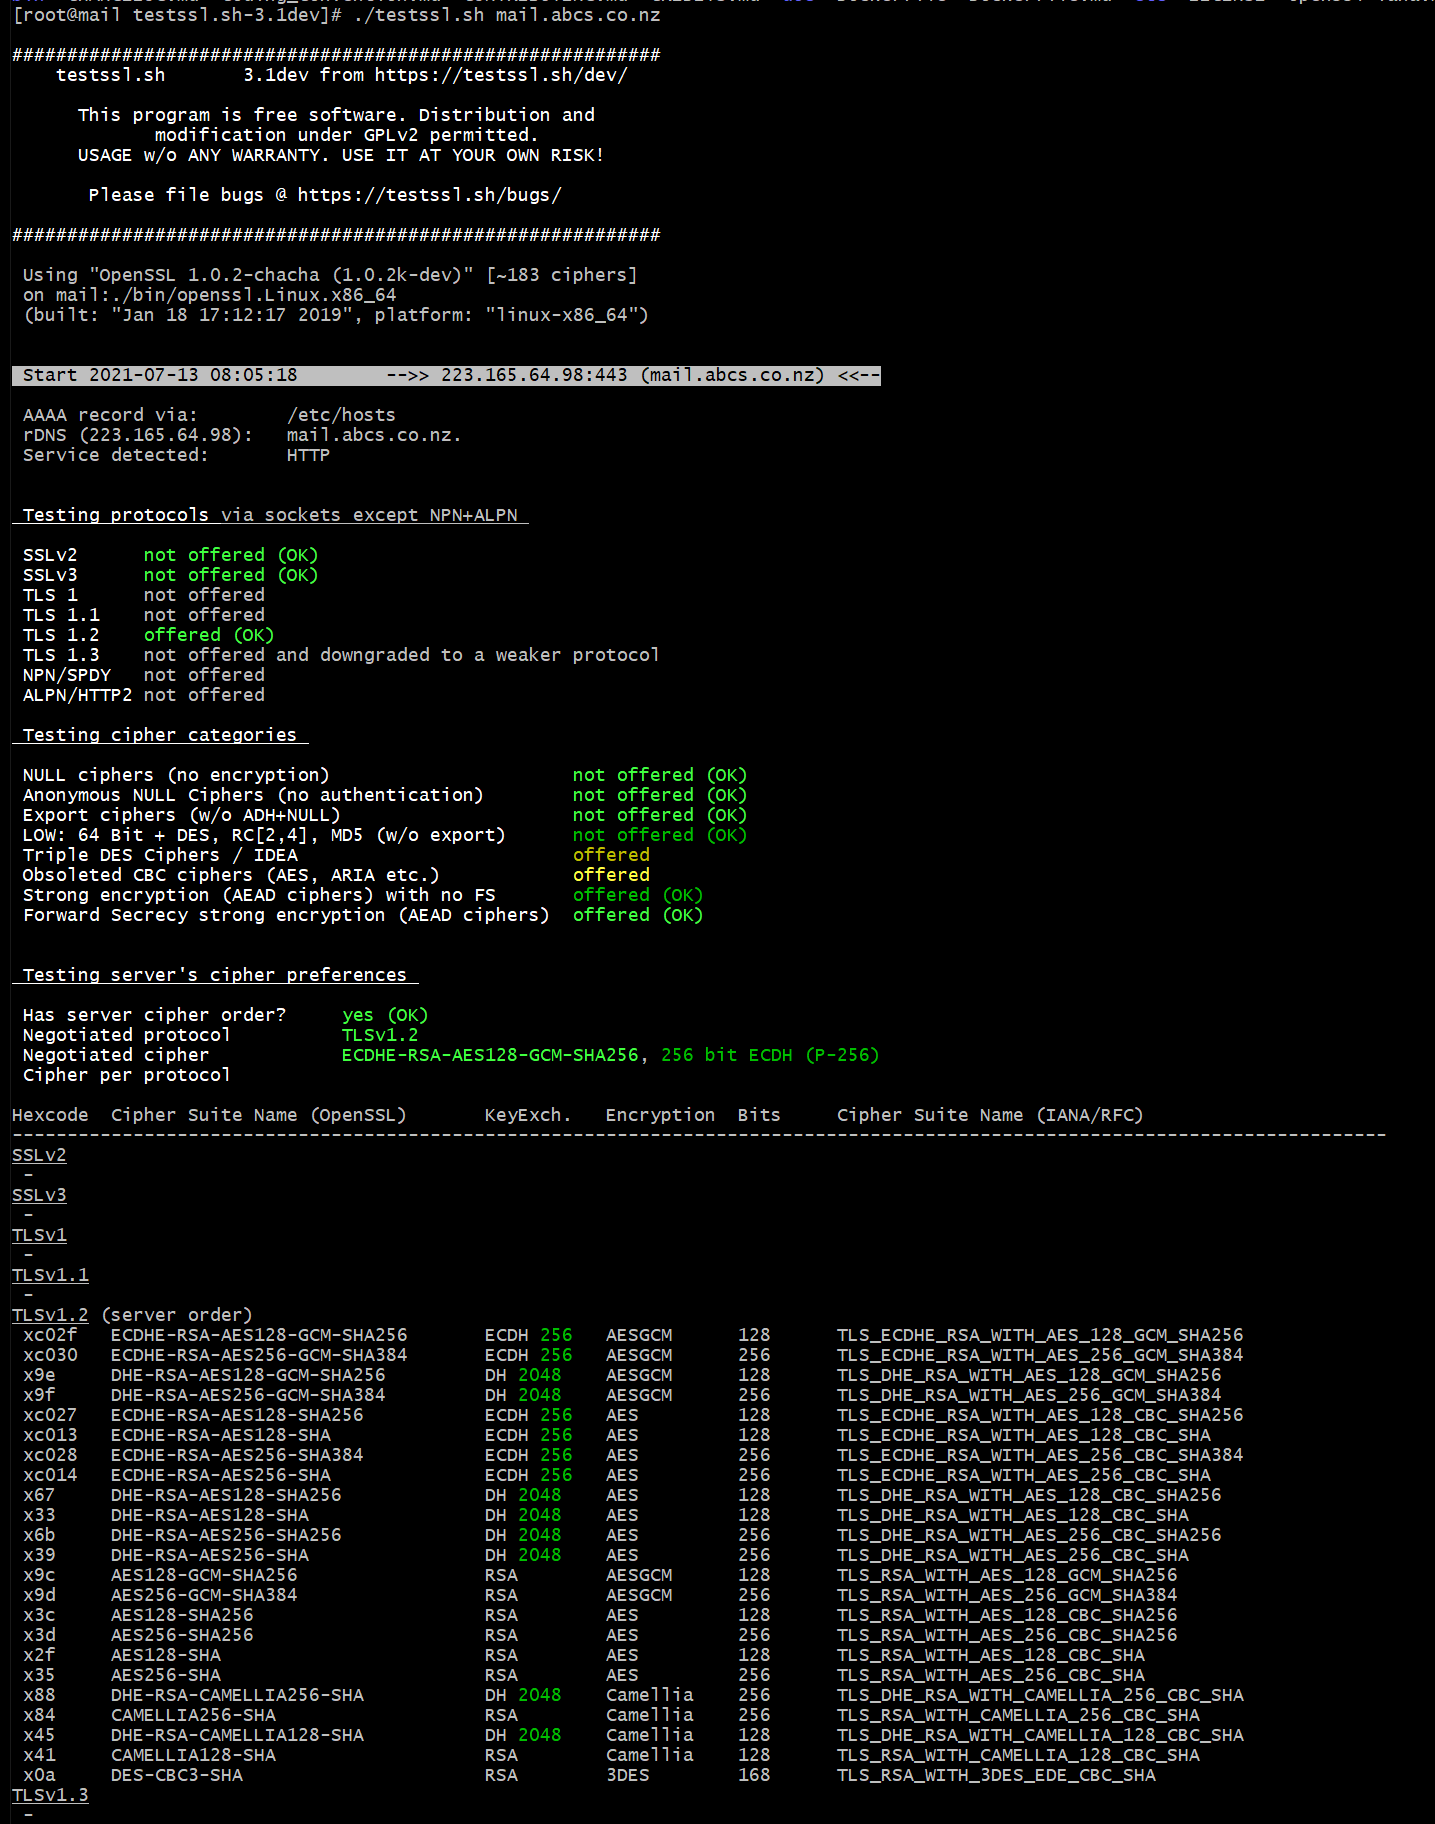
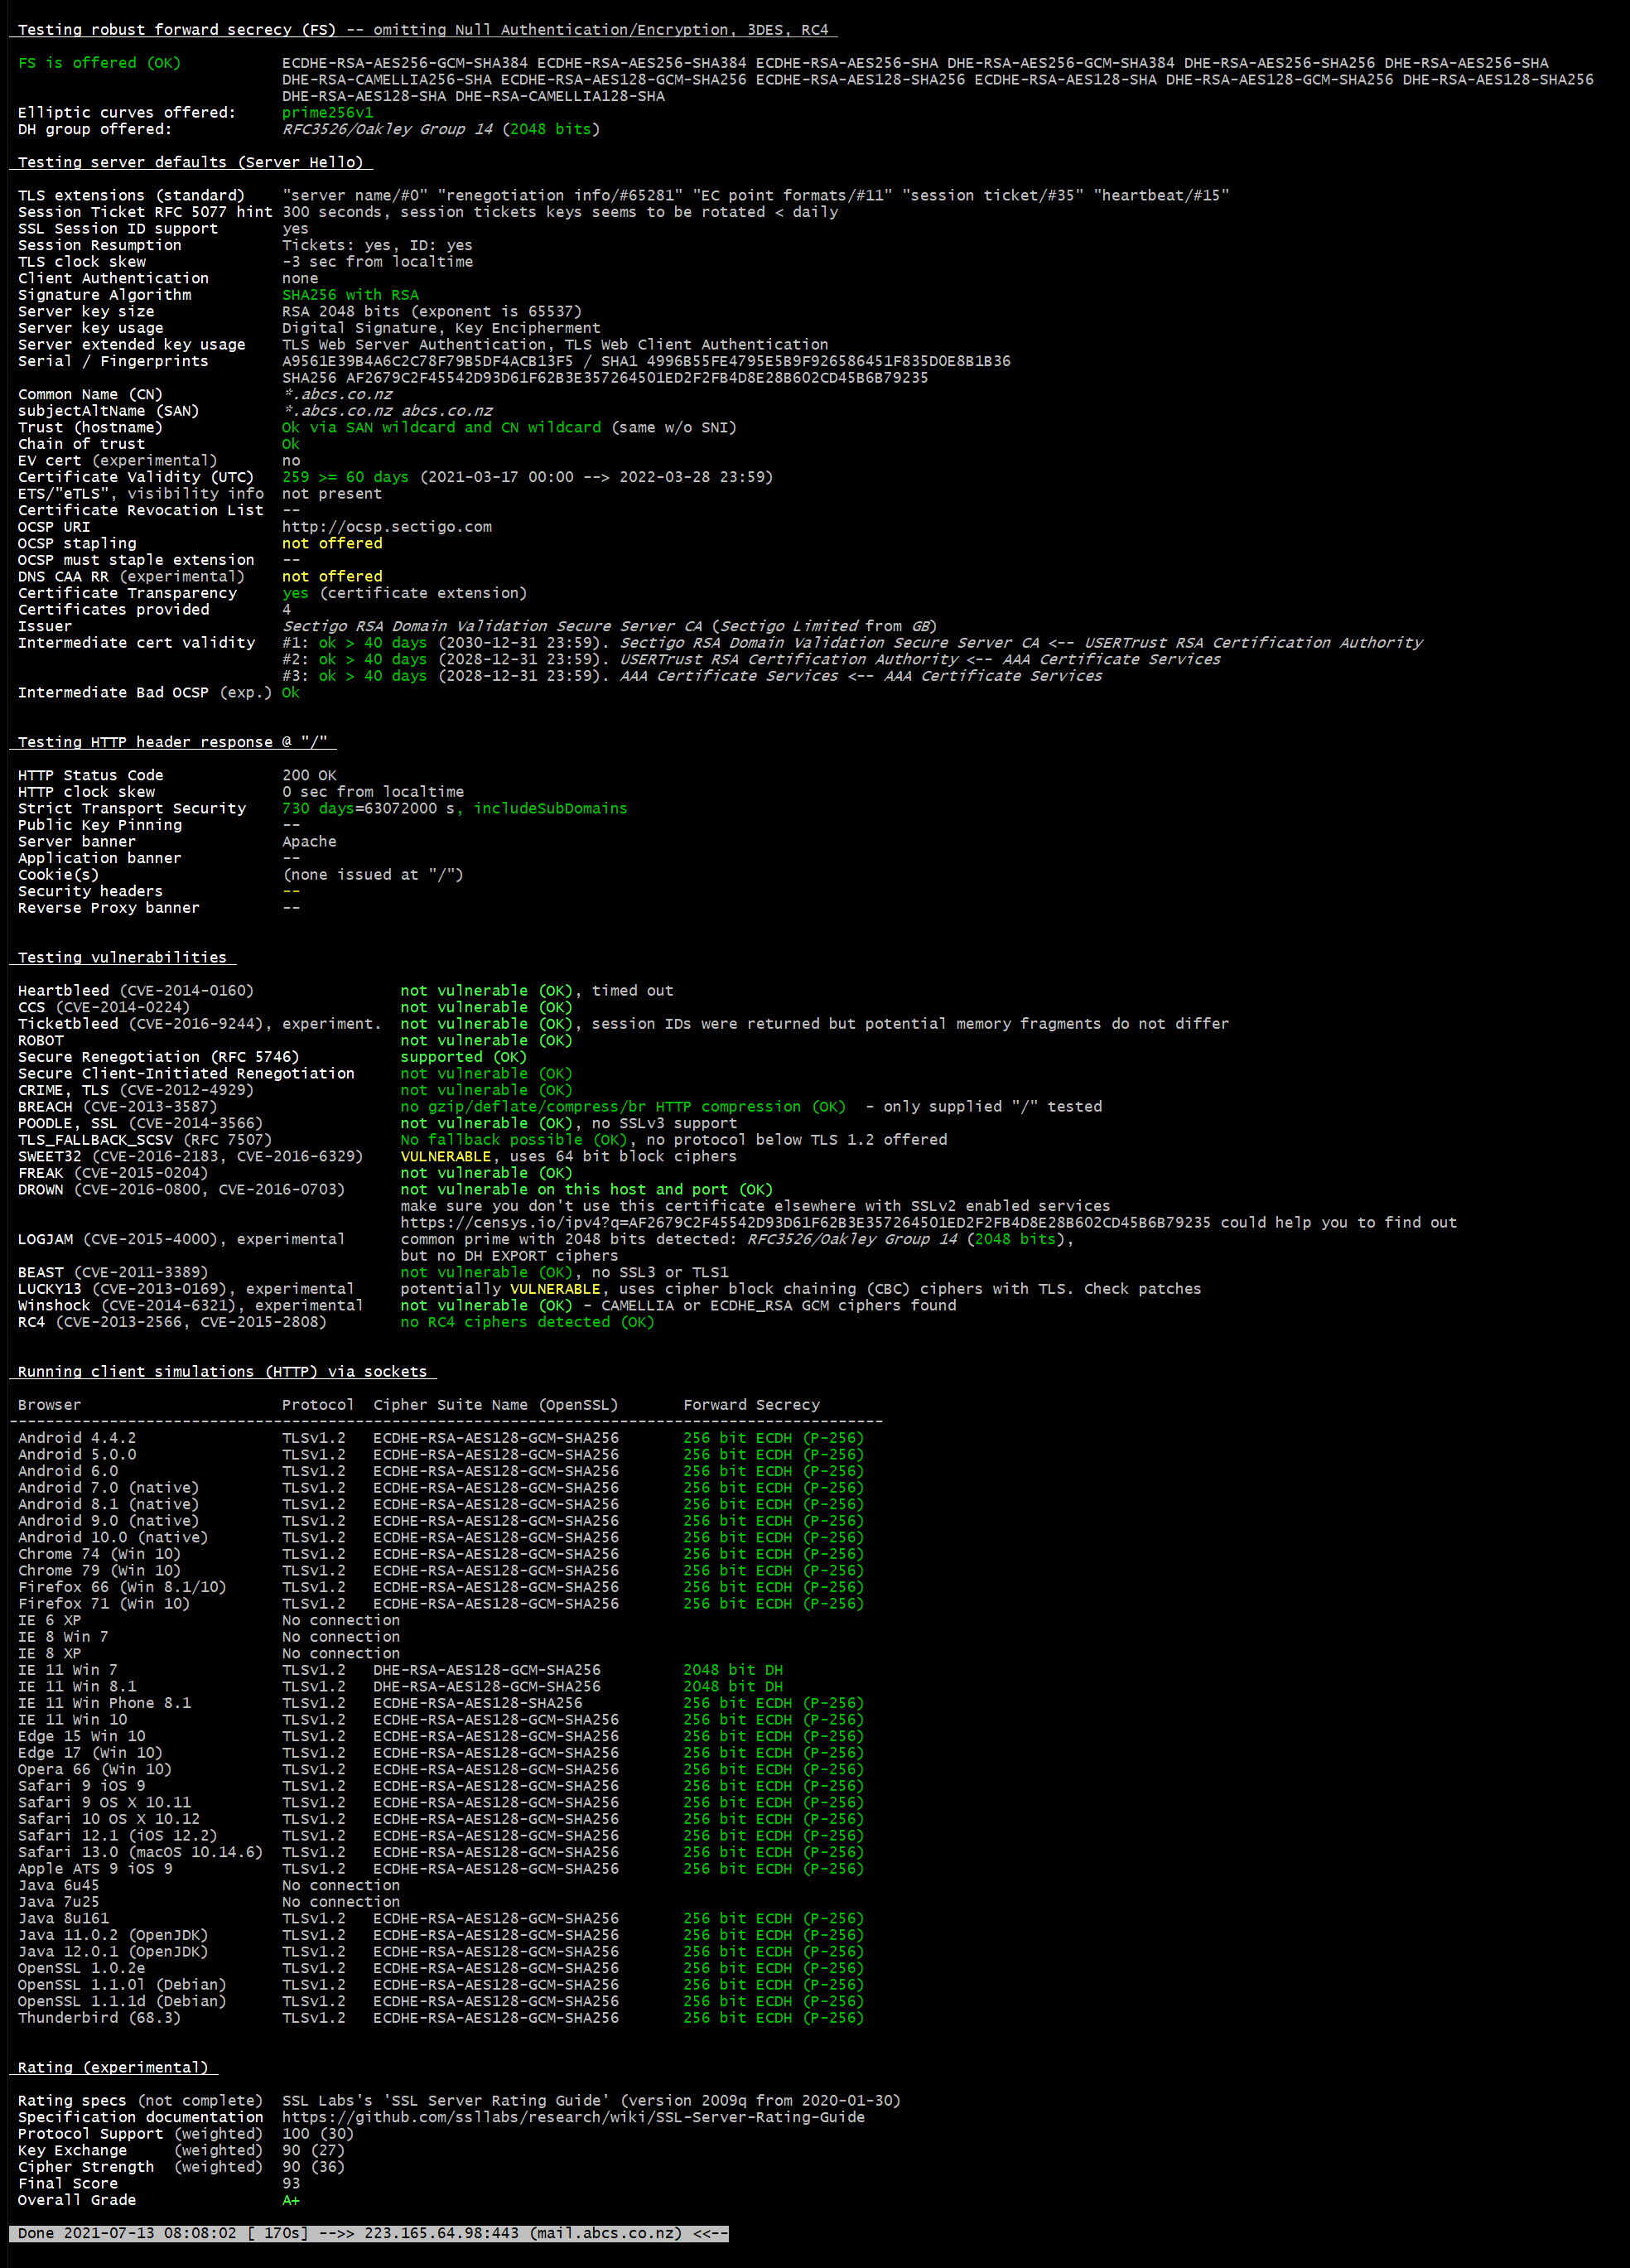
testssl.sh - testing SSL
Posted: 12 Jul 2021, 20:33pm - MondayI have been using https://www.ssllabs.com/ssltest/analyze.html and today I found a script to give me report the same ssllabs.com does.
The bash script based is really good. Very helpful giving me the report I need.
https://testssl.sh/ -- You can download the script from their github.
Here's the sample report: (I can display this because its an A+ verdict)
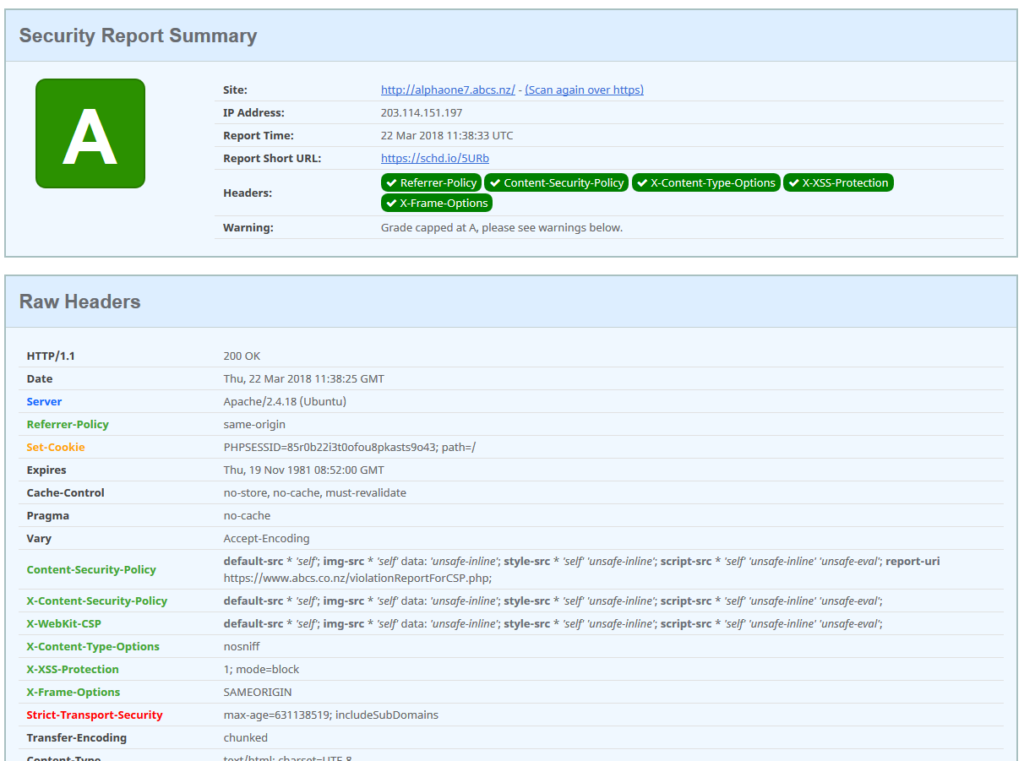
[securityheaders.io] Getting an "A"
Posted: 22 Mar 2018, 11:29am - Thursday# # to apply this settings, you must enable apache headers first... # e.g.: a2enmod headers # # headers customised by camilo3rd | 2018-03-22 ---- [start] # Header unset Content-Security-Policy #Header add Content-Security-Policy "default-src 'self'" Header add Content-Security-Policy "default-src * 'self'; img-src * 'self' data: 'unsafe-inline'; style-src * 'self' 'unsafe-inline'; script-src * 'self' 'unsafe-inline' 'unsafe-eval'; report-uri https://www.abcs.co.nz/violationReportForCSP.php;" Header unset X-Content-Security-Policy #Header add X-Content-Security-Policy "default-src 'self'" Header add X-Content-Security-Policy "default-src * 'self'; img-src * 'self' data: 'unsafe-inline'; style-src * 'self' 'unsafe-inline'; script-src * 'self' 'unsafe-inline' 'unsafe-eval';" Header unset X-WebKit-CSP #Header add X-WebKit-CSP "default-src 'self'" Header add X-WebKit-CSP "default-src * 'self'; img-src * 'self' data: 'unsafe-inline'; style-src * 'self' 'unsafe-inline'; script-src * 'self' 'unsafe-inline' 'unsafe-eval';" Header always set Referrer-Policy "same-origin" Header set X-Content-Type-Options "nosniff" Header set X-XSS-Protection "1; mode=block" #Header set X-Frame-Options "DENY" Header set X-Frame-Options SAMEORIGIN Header set Strict-Transport-Security "max-age=631138519; includeSubDomains" # # headers customised by camilo3rd | 2018-03-22 ---- [end] #Then save.. Restart your apache and that's it. You should get an A score.
 To understand those statements above especially the values, please refer to:
- https://developers.google.com/web/fundamentals/security/csp/
- https://content-security-policy.com/
My Server's 100 days
Posted: 16 Mar 2015, 7:45am - Monday[root@server ~]# uptime 20:43:38 up 100 days, 19:11, 2 users, load average: 0.00, 0.01, 0.05
Cisco 1841 configuration for Vodafone NZ UFB
Posted: 8 Dec 2014, 3:13am - MondayBuilding configuration... Current configuration : 1742 bytes ! version 12.x service timestamps debug datetime msec service timestamps log datetime msec no service password-encryption ! hostname camilord.net ! boot-start-marker boot-end-marker ! enable secret 5 $1$xxxxxxxxxxxxxxxxxxxxx0 ! no aaa new-model ! resource policy ! mmi polling-interval 60 no mmi auto-configure no mmi pvc mmi snmp-timeout 180 ip cef ! ! no ip dhcp use vrf connected ip dhcp excluded-address 192.168.0.1 192.168.0.49 ip dhcp excluded-address 192.168.0.200 192.168.0.254 ! ip dhcp pool INTERNAL import all network 192.168.0.0 255.255.255.0 default-router 192.168.0.1 ! ! no vlan accounting ! ! ! ! ! interface FastEthernet0/0 no ip address duplex auto speed auto ! interface FastEthernet0/0.10 encapsulation dot1Q 10 ip address dhcp ip nat outside no snmp trap link-status ! interface FastEthernet0/1 ip address 192.168.0.1 255.255.255.0 ip nat inside duplex auto speed auto ! interface ATM0/0/0 no ip address shutdown no atm ilmi-keepalive dsl operating-mode auto ! interface Serial0/1/0 no ip address shutdown no fair-queue clock rate 2000000 ! interface Serial0/1/1 no ip address shutdown clock rate 2000000 ! ip default-gateway [YOUR_ISP_GATEWAY] ip route 0.0.0.0 0.0.0.0 [YOUR_ISP_GATEWAY] ! ! ip http server no ip http secure-server ip nat inside source list 100 interface FastEthernet0/0.10 overload ip nat inside source static [HOME_SERVER_IP] interface FastEthernet0/0.10 ! access-list 100 remark Traffic allowed to NAT access-list 100 permit ip 192.168.0.0 0.0.0.255 any access-list 100 deny ip any any ! ! ! control-plane ! ! banner motd ^CCAMILO3RD NETWORK: Restricted Area! Authorised Access only!^C ! line con 0 password xxxxxxxxxx login line aux 0 line vty 0 4 password xxxxxxxxxx login ! endNote: [YOUR_ISP_GATEWAY] is an IP address, this value should be replaced, please refer to your current modem configuration. [HOME_SERVER_IP] is my home server, forwarding all incoming request traffic to my home server. In my case, I got public/static IP address to forward all the traffic. If you need access to your Vodafone default modem-router (in my case its HG659), use:
Username: Admin
Password: VF-NZhg659
or visit http://www.neatstuff.co.nz/HG6
Code Igniter: Cannot get POST values
Posted: 27 Mar 2014, 22:01pm - Thursday# cd /etc/apache2/mods-enabled/ # locate mod_rewrite /usr/lib/apache2/modules/mod_rewrite.so # touch rewrite.load # nano rewrite.loadAt the file:
LoadModule rewrite_module /usr/lib/apache2/modules/mod_rewrite.soSave the changes and restart apache. Hope this will help you... Pee coding!
Git: Can't push problem
Posted: 11 Feb 2014, 8:12am - Tuesday[root@git helpdesk]# find /home/git/repotest.git -type d -exec chmod 775 {} +
or if still doesnt work...
[root@git helpdesk]# chmod 775 -R /home/git/repotest.gitSo that git can write files... Done!
Manage Apache Download Speed and Traffic Limits
Posted: 13 Jun 2012, 22:36pm - Wednesday- Install Apache Development libraries by casting "yum -y install apache-devel"
- Download "mod_cband" from http://dembol.org/blog/mod_cband/ or direct download link at http://dembol.org/downloads/cband/mod-cband-0.9.7.5.tgz
cd ~
wget http://dembol.org/downloads/cband/mod-cband-0.9.7.5.tgz
tar xzvf mod-cband-0.9.7.5.tgz
cd mod-cband-0.9.7.5
./configure
make
make install
To check if successfully installed, type just like below and must have same result:
[root@localhost ~]# cat /etc/httpd/conf/httpd.conf | grep mod_cband.so
LoadModule cband_module       /usr/lib/httpd/modules/mod_cband.so
Then add the code below at httpd.conf then save and restart apache.
CBandScoreFlushPeriod 1
CBandRandomPulse On
Next is add a "scoreboard"
mkdir /var/www/scoreboard
chown apache:apache /var/www/scoreboard/
Final steps is create an vhost entry at /etc/httpd/conf.d just like this (in my case, I created cband.com as my vhost);
[root@localhost conf.d]# cat cband.com.conf
<VirtualHost *:80>
    ServerAdmin webmaster@cband.com
    DocumentRoot /home/cband.com/public_html
    ServerName cband.com
    CBandSpeed 1024 10 30
    CBandRemoteSpeed 50kb/s 3 3
    CBandLimit 500M
    CBandExceededSpeed 128 5 15
    CBandScoreboard /var/www/scoreboard
    CBandPeriod 4W
    CBandExceededURL http://cband.com/exceeded.html

    <Location /cband-status>
      SetHandler cband-status
    </Location>
    <Location /cband-status-me>
      SetHandler cband-status-me
    </Location>

    ErrorLog logs/cband.com-error_log
    CustomLog logs/cband.com-access_log common
</VirtualHost>

[root@localhost conf.d]#
After you created the vhost file, restart your apache.
You can check the status of certain vhost by accessing the URL: http://cband.com/cband-status
or another status URL: http://cband.com/cband-status-me
Further Explanation:
- CBandSpeed 1024 10 30 -- Overall apache performance. Max bandwidth speed is 1024bits per secs. 10 requests per secs. 30 max connections
- CBandRemoteSpeed 50kb/s 3 3 -- Individual apache performance. Max bandwidth speed is 50kb/s, max 3 requests/s and max 3 connections
- CBandLimit 500M -- 500MB max bandwidth limit
- CBandExceededSpeed 128 5 15 -- Bandwidth speed limit at 128kbps, 5 request/s and max of 15 connections
- CBandScoreboard /var/www/scoreboard -- scoreboard location
- CBandPeriod 4W - time to refresh
- CBandExceededURL http://cband.com/exceeded.html -- if bandwidth exceeded, redirect to the specified URL.
You can use the following units in the mod_cband directives:

Transfer speeds:

    kbps: 1024 bits per second
    Mbps: 1024*1024 bits per second
    Gbps: 1024*1024*1024 bits per second
    The default is kbps.

Transfer quotas:

    K: 1000 bytes
    M: 1000*1000 bytes
    G: 1000*1000*1000 bytes
    Ki: 1024 bytes
    Mi: 1024*1024 bytes
    Gi: 1024*1024*1024 bytes
    The default is K.

Time periods:

    S: seconds
    M: minutes
    H: hours
    D: days
    W: weeks
    The default is S.
Reference:
Download mod_cband file:
- [download id="30"]
- http://dembol.org/downloads/cband/mod-cband-0.9.7.5.tgz
My Standard Firewall in CentOS Web Server (iptables)
Posted: 28 Jan 2012, 23:05pm - Saturday#!/bin/bash IPTABLES="/sbin/iptables" #REMOVE OLD FIREWALL /sbin/iptables -F #/sbin/iptables -X #/sbin/iptables -t nat -F #/sbin/iptables -t nat -X #/sbin/iptables -t mangle -F #/sbin/iptables -t mangle -X #ENABLE SYN COOKIES echo "1" > /proc/sys/net/ipv4/tcp_syncookies #ALLOW LOCALHOST TO OUTSIDE WORLD UNLIMITED PORTS $IPTABLES -A INPUT -i lo -j ACCEPT $IPTABLES -A OUTPUT -o lo -j ACCEPT #ALLOW UDP, DNS AND PASSIVE FTP $IPTABLES -A INPUT -i eth0 -m state --state ESTABLISHED,RELATED -j ACCEPT #ENABLE LOGGING OF SYN FLOOD $IPTABLES -N LSYNFLOOD $IPTABLES -A LSYNFLOOD -m limit --limit 10/s --limit-burst 5 -j LOG --log-prefix "fp=SYNFLOOD:1 a=DROP" $IPTABLES -A LSYNFLOOD -j DROP #TCPACCEPT - Check for SYN-Floods before letting TCP-Packets in $IPTABLES -N TCPACCEPT $IPTABLES -A TCPACCEPT -p tcp --syn -j LSYNFLOOD $IPTABLES -A TCPACCEPT -p tcp -m tcp ! --syn -m state --state NEW -j DROP #TCPACCEPT - Check for SYN-Floods before letting TCP-Packets in $IPTABLES -N MACCEPT $IPTABLES -N LMAILFLOOD $IPTABLES -A MACCEPT -p tcp --syn -m limit --limit 10/s --limit-burst 3 -j ACCEPT $IPTABLES -A MACCEPT -p tcp --syn -j LMAILFLOOD $IPTABLES -A MACCEPT -p tcp ! --syn -j ACCEPT #BASIC CHAIN RULE (PASSIVE FTP) $IPTABLES -A INPUT -p tcp -s 0/0 --dport 60000:64000 -j ACCEPT #BASIC CHAIN $IPTABLES -A INPUT -p tcp -s 0/0 --dport 7680 -j ACCEPT #SSH $IPTABLES -A INPUT -p tcp -s 0/0 --dport 80 -j ACCEPT #HTTP $IPTABLES -A INPUT -p tcp -s 0/0 --dport 443 -j ACCEPT #HTTPS $IPTABLES -A INPUT -p tcp -s 0/0 --dport 21 -j ACCEPT #FTP $IPTABLES -A INPUT -p tcp -s 0/0 --dport 993 -j ACCEPT #SSL $IPTABLES -A INPUT -p tcp -s 0/0 --dport 587 -j ACCEPT #GOOGLE SMTP $IPTABLES -A INPUT -p tcp -s 0/0 --dport 465 -j ACCEPT #GOOGLE SMTP $IPTABLES -A INPUT -p tcp -s 0/0 --dport 53 -j ACCEPT #DNS $IPTABLES -A INPUT -p tcp -s 127.0.0.1 --dport 110 -j ACCEPT #POP LOCALHOST ONLY $IPTABLES -A INPUT -p tcp -s 127.0.0.1 --dport 143 -j ACCEPT #IMAP LOCALHOST ONLY $IPTABLES -A INPUT -p tcp -s 127.0.0.1 --dport 3306 -j ACCEPT $IPTABLES -A INPUT -p tcp -s 0/0 --dport 3306 -j DROP #DROP ALL SQL $IPTABLES -A INPUT -p tcp -s 0/0 --dport 110 -j DROP #POP DROP ALL $IPTABLES -A INPUT -p tcp -s 0/0 --dport 143 -j DROP #IMAP DROP ALL #DISABLE PING FLOOD $IPTABLES -A INPUT -p icmp --icmp-type echo-request -m limit --limit 1/s -j ACCEPT $IPTABLES -A INPUT -p icmp --icmp-type echo-request -j DROP #ALLOW ALL INBOUND MAILS $IPTABLES -A INPUT -p tcp -s 0/0 --dport 25 -j ACCEPT #ALLOW OUTGOING MAILS FROM LOCALHOST ONLY /sbin/iptables -A OUTPUT -p TCP -s ! 127.0.0.1 --dport 25 -j ACCEPT #DROP ALL RELAY MAILS /sbin/iptables -A OUTPUT -p TCP -s ! 0/0 --dport 25 -j DROP #DROP EVERYTHING $IPTABLES -A INPUT -j DROP exit 0Download Firewall Bash Script: [download id="26"]