C3rd
VM: Resize Partition on a running system
Posted: 20 Sep 2021, 22:09pm - MondayI was stuck for a while how to resize a running partition in my VM. Been searching for answers and all answers are quite long except this one:
root@silex5:~# df -h
Filesystem      Size  Used Avail Use% Mounted on
udev            3.9G     0  3.9G   0% /dev
tmpfs           798M  1.1M  797M   1% /run
/dev/sda2        49G   32G   15G  69% /
tmpfs           3.9G     0  3.9G   0% /dev/shm
tmpfs           5.0M     0  5.0M   0% /run/lock
tmpfs           3.9G     0  3.9G   0% /sys/fs/cgroup
/dev/loop0      100M  100M     0 100% /snap/core/11420
/dev/loop1       18M   18M     0 100% /snap/pdftk/9
/dev/loop2      100M  100M     0 100% /snap/core/11606
tmpfs           798M     0  798M   0% /run/user/1011

root@silex5:~# growpart /dev/sda 2
CHANGED: partition=2 start=4096 old: size=104851456 end=104855552 new: size=251654111,end=251658207

root@silex5:~# resize2fs /dev/sda2
resize2fs 1.44.1 (24-Mar-2018)
Filesystem at /dev/sda2 is mounted on /; on-line resizing required
old_desc_blocks = 7, new_desc_blocks = 15
The filesystem on /dev/sda2 is now 31456763 (4k) blocks long.

root@silex5:~# df -h
Filesystem      Size  Used Avail Use% Mounted on
udev            3.9G     0  3.9G   0% /dev
tmpfs           798M  1.1M  797M   1% /run
/dev/sda2       118G   32G   81G  29% /
tmpfs           3.9G     0  3.9G   0% /dev/shm
tmpfs           5.0M     0  5.0M   0% /run/lock
tmpfs           3.9G     0  3.9G   0% /sys/fs/cgroup
/dev/loop0      100M  100M     0 100% /snap/core/11420
/dev/loop1       18M   18M     0 100% /snap/pdftk/9
/dev/loop2      100M  100M     0 100% /snap/core/11606
tmpfs           798M     0  798M   0% /run/user/1011
root@silex5:~# reboot
Reference: https://unix.stackexchange.com/questions/137482/how-to-to-resize-an-ext4-partition-from-the-command-line
GitLab: docker DNS issue and container already in use
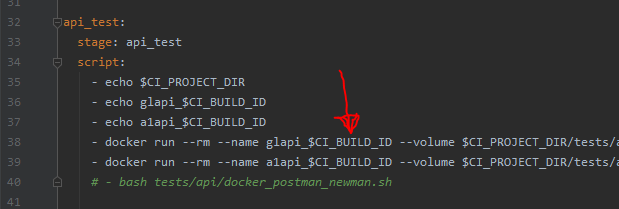
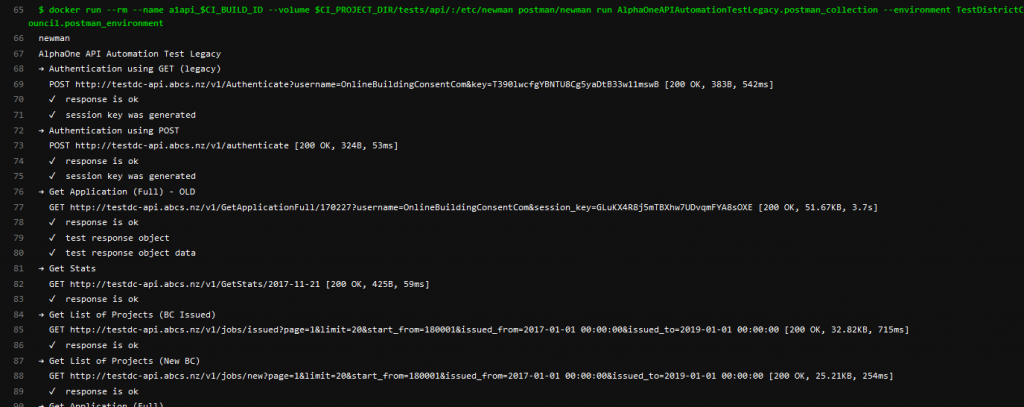
Posted: 6 May 2020, 21:46pm - WednesdayI decided to create another stage to test our API in GitLab CI runner using postman/newman. I made it work but there are issues from time to time like DNS issue and "container already in use" (see screenshot below). The common error that occurs most of the time is the DNS issue.
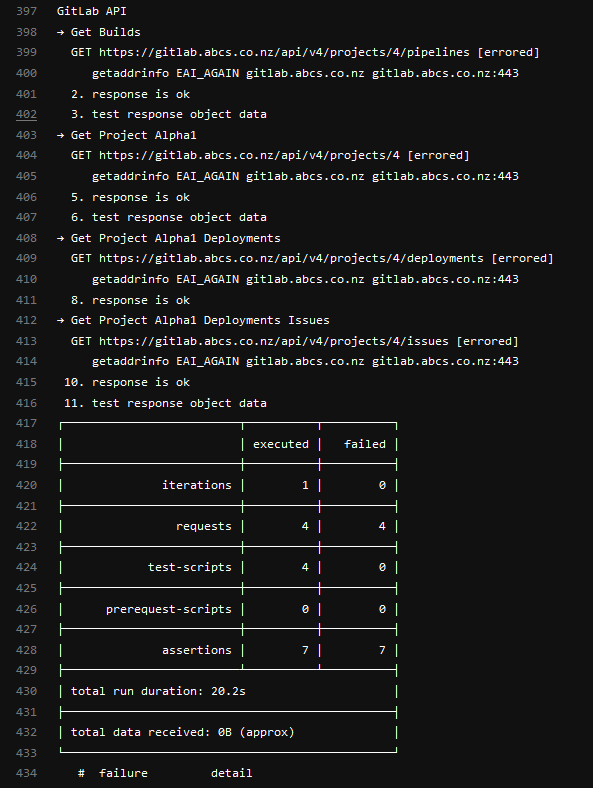
In my various experiments, I managed to resolve the `container already in use` issue by adding the container name with commit ID from gitlab.

However, since I implemented the commit ID on the container, the DNS issue reduced from 8/10 fails to 2/10 fails. It still fail time to time, its not perfect but for now its tolerable. I hope there's a better solution.
CentOS / RHEL 7 : How to create custom daemon service
Posted: 25 Jul 2018, 13:08pm - Wednesday# vi /root/firewalld.sh #!/bin/bash iptables -F iptables -LThen make this executable...
chmox u+x /root/firewalld.shthen you need to create the daemon service
# vi /etc/systemd/system/sample.service
[Unit]
Description=Description for sample script goes here
After=network.target

[Service]
Type=simple
ExecStart=/root/firewalld.sh
TimeoutStartSec=0

[Install]
WantedBy=default.target
definitions:
After= : If the script needs any other system facilities (networking, etc), modify the [Unit] section to include appropriate After=, Wants=, or Requires= directives.
Type= : Switch Type=simple for Type=idle in the [Service] section to delay execution of the script until all other jobs are dispatched
WantedBy= : target to run the sample script in
then cast the commands below:
# systemctl daemon-reload
# systemctl enable sample.service
# systemctl start sample.service
# systemctl reboot
after rebooting, your script should be executed. Reference: https://www.thegeekdiary.com/centos-rhel-7-how-to-make-custom-script-to-run-automatically-during-boot/
Centos 6.2: PHP, MySQL and Nginx
Posted: 21 Jun 2012, 15:53pm - Thursday[root@server ~]# wget http://ftp.jaist.ac.jp/pub/Linux/Fedora/epel/6/i386/epel-release-6-7.noarch.rpm [root@server ~]# rpm -ivh epel-release-6-7.noarch.rpm [root@server nginx]# yum repolist Loaded plugins: fastestmirror, protectbase, security Loading mirror speeds from cached hostfile * base: centos.ipserverone.com * epel: ftp.cuhk.edu.hk * extras: centos.ipserverone.com * updates: centos.ipserverone.com 0 packages excluded due to repository protections repo id repo name status base CentOS-6 - Base 6,294 epel Extra Packages for Enterprise Linux 6 - x86_64 7,561 extras CentOS-6 - Extras 6 nginx nginx repo 23 updates CentOS-6 - Updates 1,147 repolist: 15,031Then install nginx.
[root@server ~]# yum -y install nginxInstall PHP, MySQL and other packages.
[root@server ~]# yum -y install php-pear-Net-Socket php-pear php-common php-gd php-devel php php-mbstring php-pear-Mail php-cli php-imap php-snmp php-pdo php-xml php-pear-Auth-SASL php-ldap php-pear-Net-SMTP php-mysqlInstall spawn-fgi
[root@server ~]# yum -y install spawn-fcgiDownload and setup the spawn-fcgi to init.d ([download id="32"])
[root@server ~]# wget http://bash.cyberciti.biz/dl/419.sh.zip
[root@server ~]# unzip 419.sh.zip
[root@server ~]# mv 419.sh /etc/init.d/php_cgi
[root@server ~]# chmod +x /etc/init.d/php_cgi
Start PHP app server and check if running
[root@server ~]# /etc/init.d/php_cgi start
[root@server ~]# netstat -tulpn | grep :9000
tcp        0      0 127.0.0.1:9000              0.0.0.0:*                   LISTEN      1843/php-cgi
Configure nginx.conf for PHP based webserver for Wordpress, Drupal & Joomla (Download: [download id="33"]).
[root@server nginx]# cat nginx.conf

user  nginx;
worker_processes  1;

error_log  /var/log/nginx/error.log warn;
pid        /var/run/nginx.pid;

events {
    worker_connections  1024;
}

http {
    include       /etc/nginx/mime.types;
    default_type  application/octet-stream;

    log_format  main  '$remote_addr - $remote_user [$time_local] "$request" '
                      '$status $body_bytes_sent "$http_referer" '
                      '"$http_user_agent" "$http_x_forwarded_for"';

    access_log  /var/log/nginx/access.log  main;

    sendfile        on;
    #tcp_nopush     on;

    keepalive_timeout  65;

    #gzip  on;

    include /etc/nginx/conf.d/*.conf;

    server {
        listen 80 default_server;
        server_name .nginx.ph;
        access_log /var/log/nginx/nginx.ph_access_log;
        error_log /var/log/nginx/nginx.ph_error_log;

        index index.html index.php index.htm;

        root /home/camilord/public_html;

        location / {
           # if you're just using wordpress and don't want extra rewrites
           # then replace the word @rewrites with /index.php
           try_files $uri $uri/ @rewrites;
        }

        location @rewrites {
           # Can put some of your own rewrite rules in here
           # for example rewrite ^/~(.*)/(.*)/? /users/$1/$2 last;
           # If nothing matches we'll just send it to /index.php
           rewrite ^ /index.php last;
        }

        # This block will catch static file requests, such as images, css, js
        # The ?: prefix is a 'non-capturing' mark, meaning we do not require
        # the pattern to be captured into $1 which should help improve performance
        location ~* \.(?:ico|css|js|gif|jpe?g|png)$ {
                # Some basic cache-control for static files to be sent to the browser
                expires max;
                add_header Pragma public;
                add_header Cache-Control "public, must-revalidate, proxy-revalidate";
        }

        # remove the robots line if you want to use wordpress' virtual robots.txt
        location = /robots.txt  { access_log off; log_not_found off; }
        location = /favicon.ico { access_log off; log_not_found off; }

        # this prevents hidden files (beginning with a period) from being served
        location ~ /\.          { access_log off; log_not_found off; deny all; }

        location ~ \.php {
                fastcgi_param  QUERY_STRING       $query_string;
                fastcgi_param  REQUEST_METHOD     $request_method;
                fastcgi_param  CONTENT_TYPE       $content_type;
                fastcgi_param  CONTENT_LENGTH     $content_length;

                fastcgi_param  SCRIPT_NAME        $fastcgi_script_name;
                fastcgi_param  SCRIPT_FILENAME    $document_root$fastcgi_script_name;
                fastcgi_param  REQUEST_URI        $request_uri;
                fastcgi_param  DOCUMENT_URI       $document_uri;
                fastcgi_param  DOCUMENT_ROOT      $document_root;
                fastcgi_param  SERVER_PROTOCOL    $server_protocol;

                fastcgi_param  GATEWAY_INTERFACE  CGI/1.1;
                fastcgi_param  SERVER_SOFTWARE    nginx;

                fastcgi_param  REMOTE_ADDR        $remote_addr;
                fastcgi_param  REMOTE_PORT        $remote_port;
                fastcgi_param  SERVER_ADDR        $server_addr;
                fastcgi_param  SERVER_PORT        $server_port;
                fastcgi_param  SERVER_NAME        $server_name;

                fastcgi_pass 127.0.0.1:9000;
        }

       #location ~ \.php$
       #{
       #    root           html;
       #    fastcgi_pass   127.0.0.1:9000;
       #    fastcgi_index  index.php;
       #    fastcgi_param  SCRIPT_FILENAME  /usr/share/nginx/html$fastcgi_script_name;
       #    include        fastcgi_params;
       #}
    }
}
Restart Nginx
[root@server ~]# service nginx restartI think that's it.. it should be working because its working on my CentOS linux box. :) Reference:
- http://www.cyberciti.biz/faq/rhel-fedora-install-configure-nginx-php5/
- http://www.cyberciti.biz/faq/rhel-fedora-centos-linux-enable-epel-repo/
- http://www.thegeekstuff.com/2012/06/enable-epel-repository/
- http://ftp.jaist.ac.jp/pub/Linux/Fedora/epel/6/i386/repoview/epel-release.html
- http://wiki.nginx.org/ServerBlockExample
- http://kbeezie.com/view/nginx-configuration-examples/
MySQL 5.5 changing data folder
Posted: 14 Jul 2011, 8:08am - Thursday- create folder in "C:\MySQLData"
- copy all files from "C:\Users\All Users\MySQL\MySQL Server 5.5\data" to "C:\MySQLData"
- go to RUN and type services.msc and stop MySQL service
- at "C:\Program Files\MySQL\MySQL Server 5.5" -- edit the my.ini and change the datadir value to your new MySQL data folder which is "C:/MySQLData/"
- after changing the datadir, at Services window (services.msc) start again your MySQL
- then cast command in MySQL CLI "show databases" and you should get your migrated databases showing... :)
Generating SSL certificates using OpenSSL
Posted: 10 May 2010, 12:56pm - Monday
#!/bin/bash
umask 077

echo ""
if [ $# -eq 0 ] ; then
 echo $"Usage: `basename $0` <DOMAIN_NAME> [...]"
 echo ""
 exit 0
fi

for target in $@ ; do

 keyFile=${target}.key
 crtFile=${target}.crt
 csrFile=${target}.csr

 echo $keyFile
 echo $crtFile
 echo $csrFile

 # Generate private key
 openssl genrsa -out $keyFile 1024

 # Generate CSR
 openssl req -new -key $keyFile -out $csrFile

 echo ""
 echo "Please enter the number of days which SSL Certificate will be valid:"
 read DAYS
 echo ""

 # Generate Self Signed Key
 openssl x509 -req -days $DAYS -in $csrFile -signkey $keyFile -out $crtFile
done
Or download the script below...
Download: [download id="8"] bash script
How to add gencert command to your system:
- Download the gencert bash script
- Extract the file
- chmod u+x gencert
- then copy the gencert file to /bin/
- Wallaah! You're done!
HowTo: Install CentOS Web Server + cPanel
Posted: 30 Apr 2009, 9:45am - Thursday [/caption]
This is a basic installation tutorial for the CentOS operating system for dedicated server duties. CentOS is a free white label distro of RedHat Enterprise with all the bells and whistles, and is the OS of choice for many web hosting companies Installing the OS using ‘Text Mode’ : 1 - Insert the first Linux installation CD-ROM (disc 1) in the CD-ROM drive of your server and restart the server. 2 - At the boot: prompt, type text and press the Enter key. This starts the installation process. 3 - On the Language Selection screen, select English as the language that you want to run the installation program in, then click OK. 4 - On the Keyboard Selection screen, select the keyboard attached to your server, then click OK. 5 - On the Mouse Selection screen, select the mouse attached to your server, then click OK. 6 - On the Welcome screen, review the installation information, then click OK. 7 - On the Installation Type screen, select Custom, then click OK. 8 - On the Disk Partitioning Setup screen, select Disk Druid. Quote: - If your disk has existing partitions, select each partition and click Delete. 9 - Create the following disk partitions:
The following partitions are recommended prior to installing cPanel: **1 GB / *50 MB /boot (No seperate /boot for FreeBSD) **1 GB /tmp *10 GB /usr **7 GB /var **1 GB swap (swap should be 2x RAM) Remaining space to /homeNote: The above partitioning scheme is assuming a 40 GB hard drive. If you have a larger hard drive, you should increment /usr & /var accordingly. To create the / partition ‘root’: * On the Partitioning screen (see step 8 ) , click New. * In the Mount Point field, type / . * For the Filesystem type select ext3. * In the Size (MB) field, type 1024, then click OK. To create the /boot partition: Quote: * On the Partitioning screen (see step 8 ) , click New. * In the Mount Point field, type /boot. * For the Filesystem type select ext3. * In the Size (MB) field, type 50, then click OK. To create the /tmp partition : Quote: * On the Partitioning screen (see step 8 ) , click New. * In the Mount Point field, type /tmp . * For the Filesystem type select ext3. * In the Size (MB) field, type 1024, then click OK. To create the /usr partition : Quote: * On the Partitioning screen (see step 8 ) , click New. * In the Mount Point field, type /usr . * For the Filesystem type select ext3. * In the Size (MB) field, type 10240, then click OK. To create the /var partition : Quote: * On the Partitioning screen (see step 8 ) , click New. * In the Mount Point field, type /var . * For the Filesystem type select ext3. * In the Size (MB) field, type 7168, then click OK. To create the swap partition: Quote: * On the Partitioning screen (see step , click New. * For the Filesystem type field, select swap. * In the Size (MB) field, enter a number that is twice the current RAM (1024 If you are using 512 MB Ram), then click OK. To create the /home partition: Quote: * On the Partitioning screen (see step , click New. * In the Mount Point field, type /home. * For the Filesystem type select ext3. * In the Size (MB) field, select Fill all available space, then click OK. 10 - When finished, Click OK. 11 - On the Boot Loader Configuration screen, select LILO Boot Loader, then click OK. 12 - On each of the following three screens, click OK. 13 - On the Network Configuration screen, clear Use bootp/dhcp, enter your server network configuration, then click OK. 14 - On the Hostname Configuration screen, enter the fully qualified host name of your server, then click OK. 15 - On the Firewall Configuration screen, select No firewall, then click OK. 16 - On the Language Support screen, select English (USA), then click OK. 17 - On the Time Zone Selection screen, select the location, then click OK. 18 - On the Root Password screen, enter in the root password for your server, re-enter the password to confirm it, then click OK. 19 - If you want to create an account that you can use to remotely log on to your server using SSH or FTP, click Add. *** Provide the login name and password, then click OK. 20 - Review the information on the User Account Setup screen, then click OK. 21 - Review the information on the Authentication Configuration screen, then click OK. 22 - On the Package Group Selection screen, verify that only the following packages are selected. Clear all other check boxes. . Network Support . Messaging and Web Tools . DNS Name Server . Network Managed Workstation . Software Development 23 - Click OK. 24 - Review the Installation to begin screen, then click OK. 25 - Insert the second/third installation CD-ROM when notified to, then click OK. 26 - To create a boot disk, click Yes. Otherwise, click No. 27 - When done, the installation complete screen displays. 28 - Click OK, then press Enter to restart. [2] Checking the host name and network settings : After your first boot, you must check your system’s host name and network configuration to ensure that they are correct. To check your system’s host name and network configuration: - Log on to the system as the root user. - Type vi /etc/hosts to open the host file and modify the contents. - Verify that the file is in the following format: - Verify that the loopback entry (127.0.0.1) appears in the file. A correctly configured file should look like this: Note : The IP addresses used here are for illustration purposes only; they are not valid values. # Do not remove the following line, or various programs # that require network functionality will fail. 127.0.0.1 localhost.localdomain localhost 10.1.1.1 myhost.mydomain.com myhost - Modify the file as needed. - Type :wq to close the file. - Type vi /etc/sysconfig/network to open the network sysconfig file and modify the contents. - Verify the host name. A correctly configured file should look like this: Note : The IP addresses used here are for illustration purposes only; they are not valid values.
NETWORKING=yes HOSTNAME=myserver.mydomain.com GATEWAY=10.100.0.1 - Modify the file as needed. - Type :wq to close the file. - Type vi /etc/sysconfig/network-scripts/ifcfg-eth0 to open the network scripts file and modify the contents. - Verify that network information. A correctly configured file should look like this: Note : The IP addresses used here are for illustration purposes only; they are not valid values.
DEVICE=eth0 BOOTPROTO=static BROADCAST=10.1.1.1 IPADDR=10.1.1.1 NETMASK=255.255.0.0 NETWORK=10.1.0.0 ONBOOT=yes - Modify the file as needed. - To make these changes active, restart the system by typing:shutdown -r now [3]cPanel Installation Instructions:
Important : You must have a valid cPanel license. If you do not have a valid cPanel license, please contact one of cPanel distributors listed at http://www.cpanel.net/dist.htm or buy a license directly from cPanel at http://www.cpanel.net/store/. cPanel now uses a universal install script which can be found at http://layer1.cpanel.net/. You can use the following commands in the root shell to download and start the installation script:
mkdir /home/cpins cd /home/cpins wget http://layer1.cpanel.net/latest sh latestAt this point the installation has started and may take anywhere from 30 - 60 minutes to complete. At no point during the installation should you be prompted for user input. You will know the cPanel installation has been completed by the screen output coming to a stop & the statement “Done.” is printed on your screen. You should then hit “ctrl c”† to continue. Note: You must be on a stable connection to install cPanel. If your shell session disconnects during a cPanel install the cPanel installation will be aborted. You can restart the cPanel installation by completing “sh cpanel-*”† again, however it is recommended that you reformat your machine & start over to ensure a clean slate before placing the machine into production. [4]cPanel/WHM Configuration: Following a successful install you should setup cPanel/WHM as soon as possible. In order to complete this process you will need to log into your machine using its main (eth0/fxp0) IP address; you should input something similar to this into your browser:
https://xxx.xxx.xxx.xxx:2087Note: you should replace xxx.xxx.xxx.xxx with your actual IP address. Further to that, you will be prompted about a self signed SSL certificate; ignore this by clicking on “Yes”. A self signed certificate is generated by cPanel/WHM to ensure a secure/encrypted communication with your server. You will now be prompted with a few questions related to how you would like your installation of cPanel/WHM customized. You can walk through the wizard by clicking on “Next Step” or if you are an experienced user feel free to click on “Finish” to skip to the end. For a complete user guide on how to access cPanel/WHM and/or use any of the functions within cPanel/WHM, please visit cPanel do*****ents section at http://www.cpanel.net/docs.htm That’s all for now .. Just keep in mind, this is not the all-in-one package for server installaion, you’ll have to secure the server, update your kernel, install a firewall, configure SSH, apply patches …. etc.
Reference:
testssl.sh - testing SSL
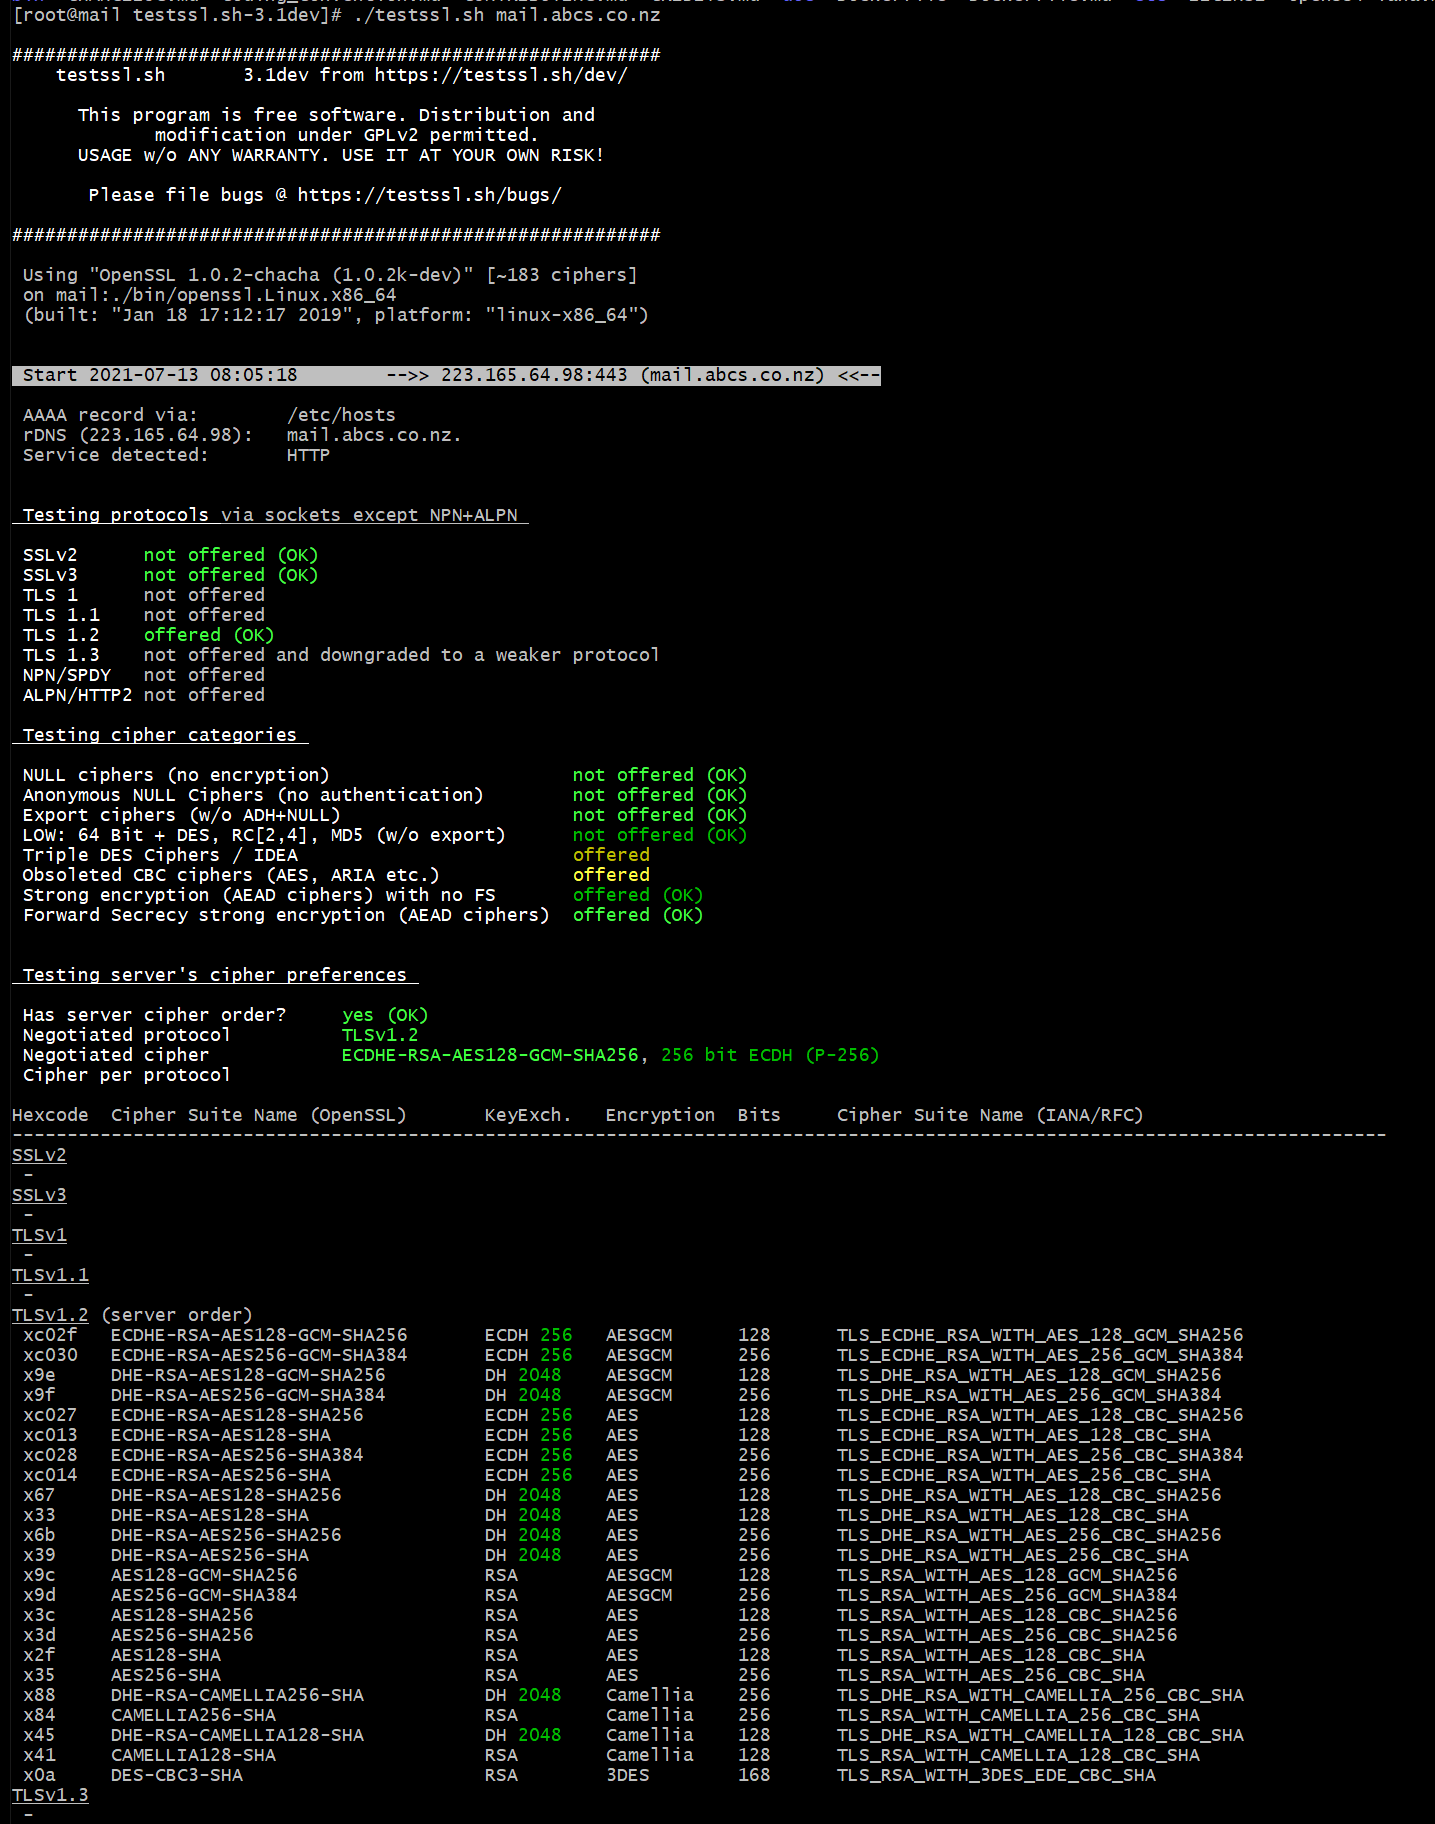
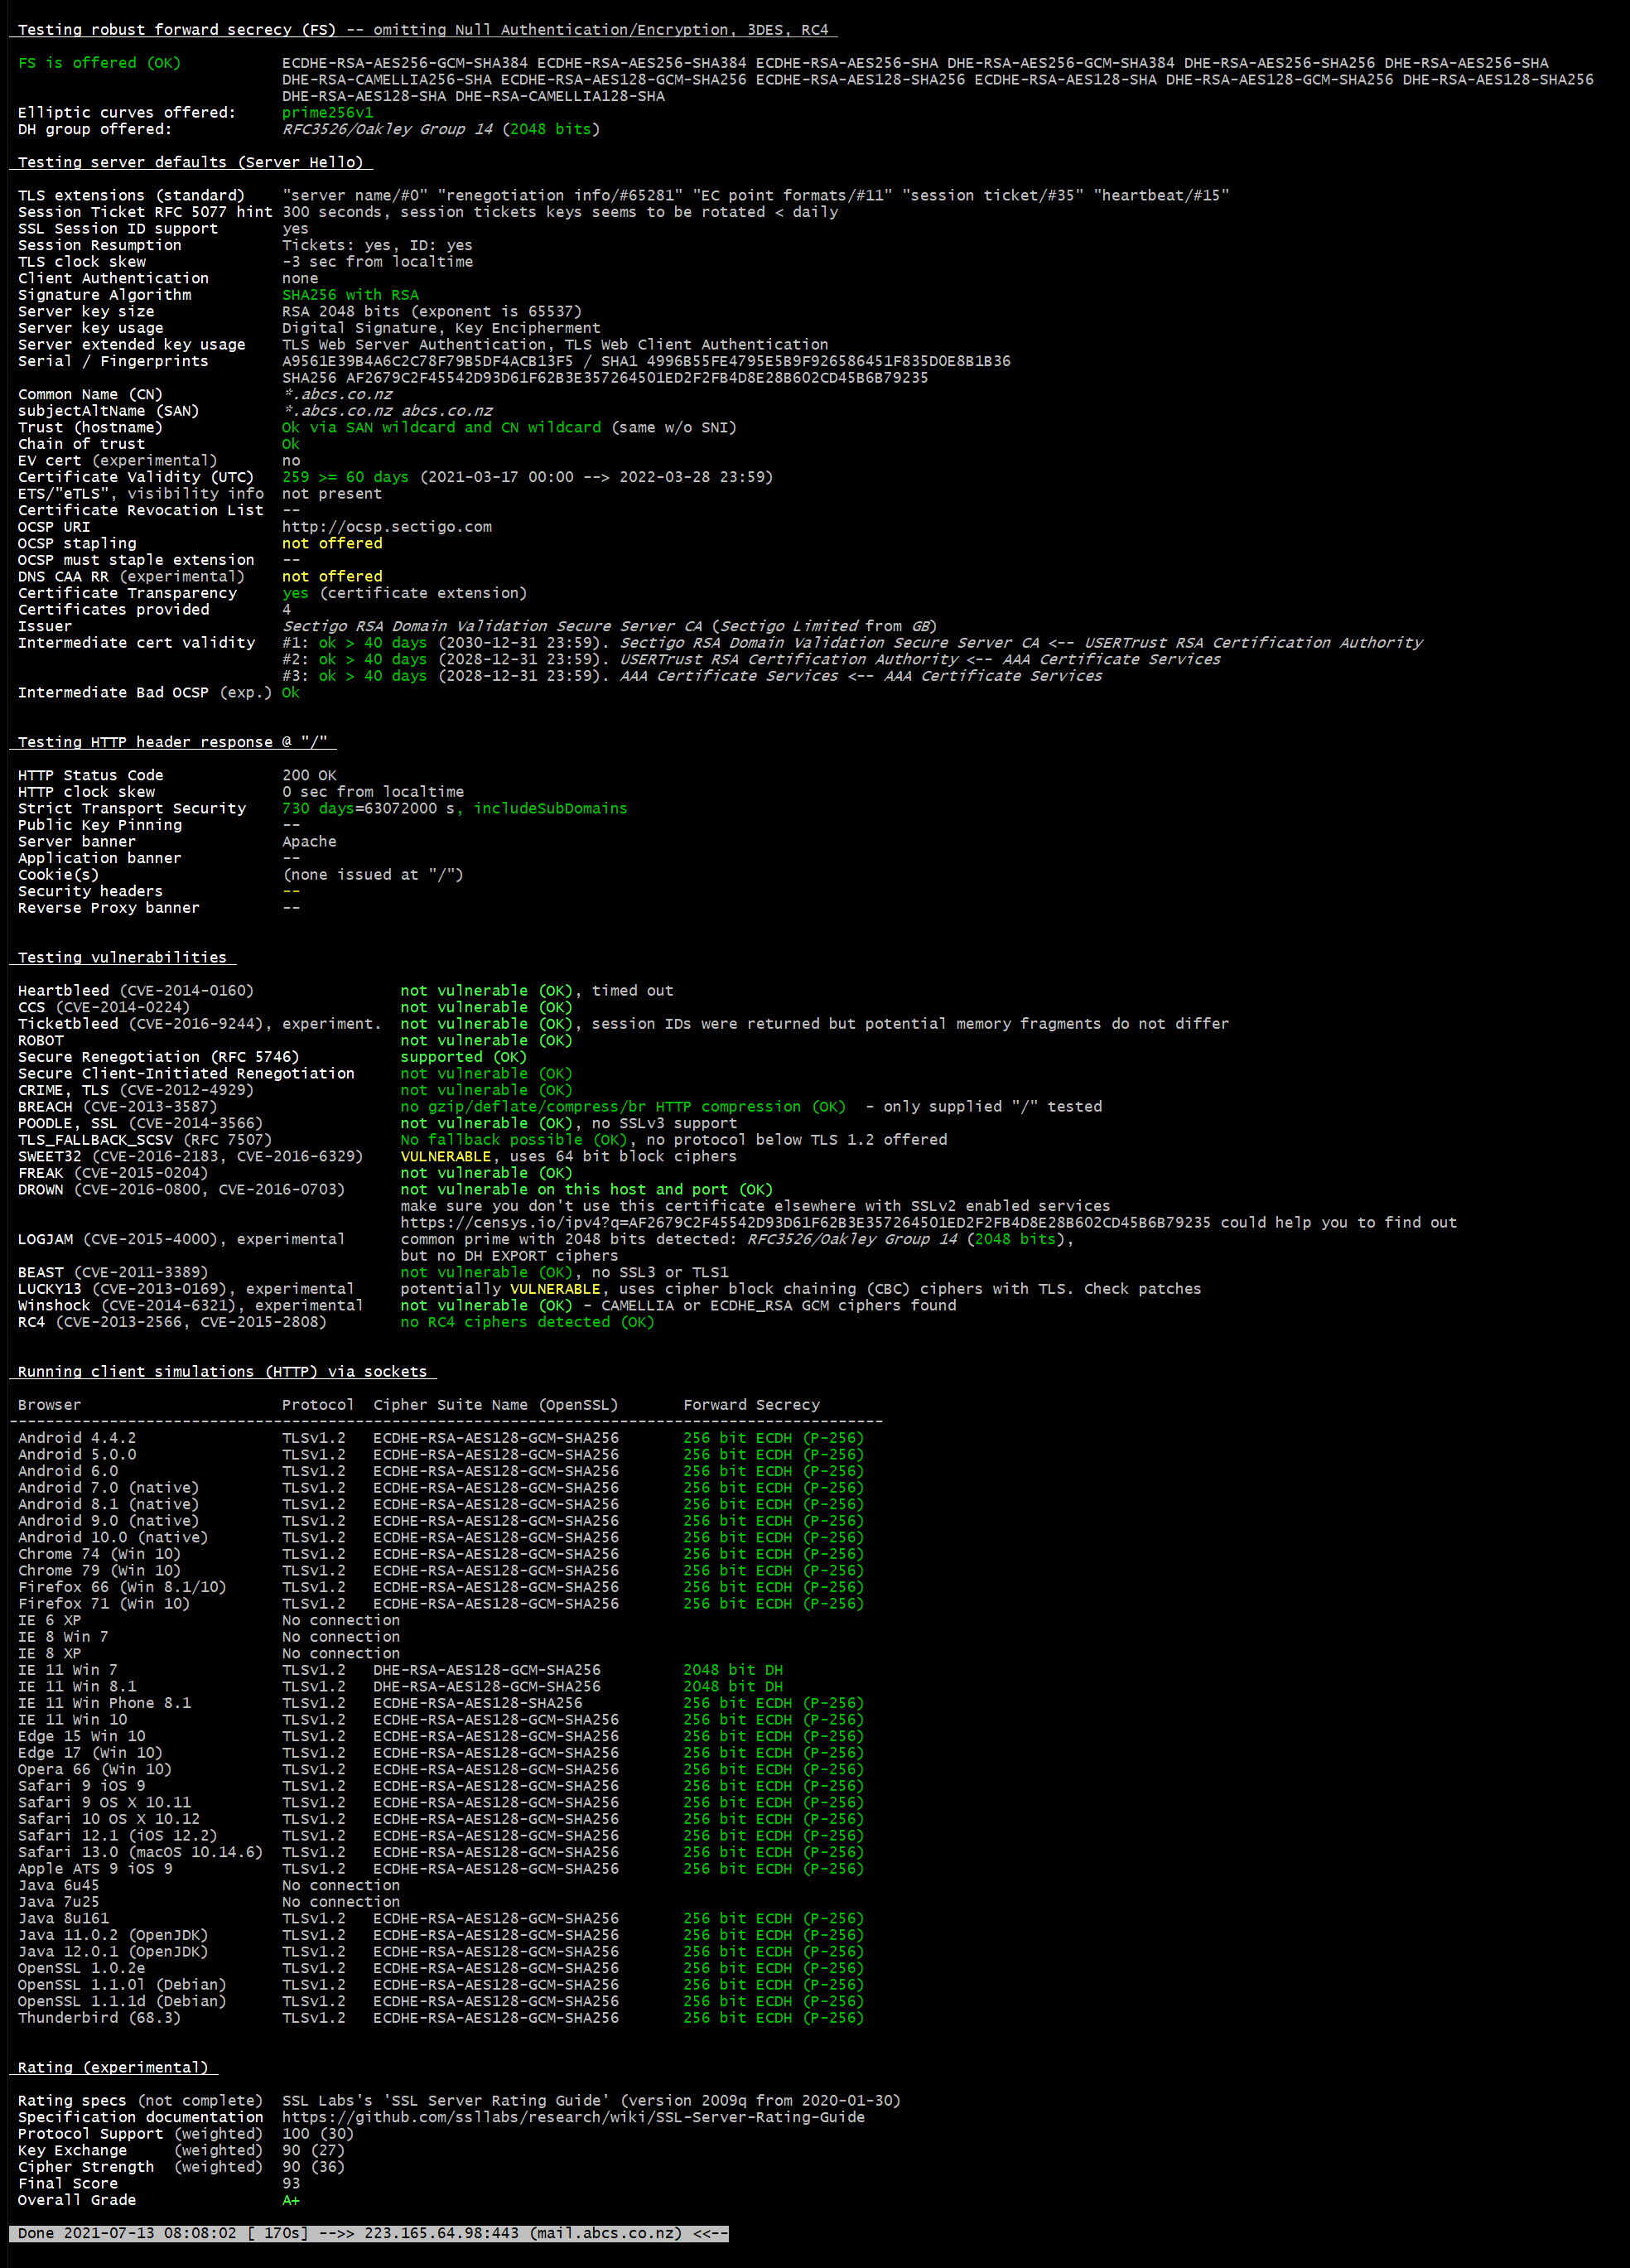
Posted: 12 Jul 2021, 20:33pm - MondayI have been using https://www.ssllabs.com/ssltest/analyze.html and today I found a script to give me report the same ssllabs.com does.
The bash script based is really good. Very helpful giving me the report I need.
https://testssl.sh/ -- You can download the script from their github.
Here's the sample report: (I can display this because its an A+ verdict)
git doesn't pull or push: "error: RPC failed; HTTP 502 curl 22 The requested URL returned: 502 Bad Gateway"
Posted: 29 Mar 2020, 19:59pm - SundayI recently encountered a weird error on my repo when I "git push" or "git pull" in Windows 7. But when I tried it on my Mac, Ubuntu & Windows 10, its working fine.

As shown above, that's the error I am getting when I pull/push. I tried the solution from others:
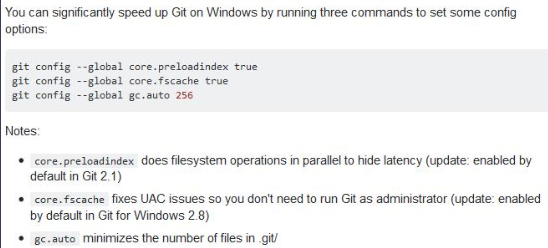
But unfortunately it didn't resolve my problem. Somehow, it did made it a bit faster.
I already tried many things, but I cannot find any solution that works for my problem. I know that the issue is just in my PC, even tried emptying my hosts file still didn't work.
Then a lightbulb popup, maybe I should delete my current repo and checkout again. So I did and resolve my problem. I can pull and push after that.
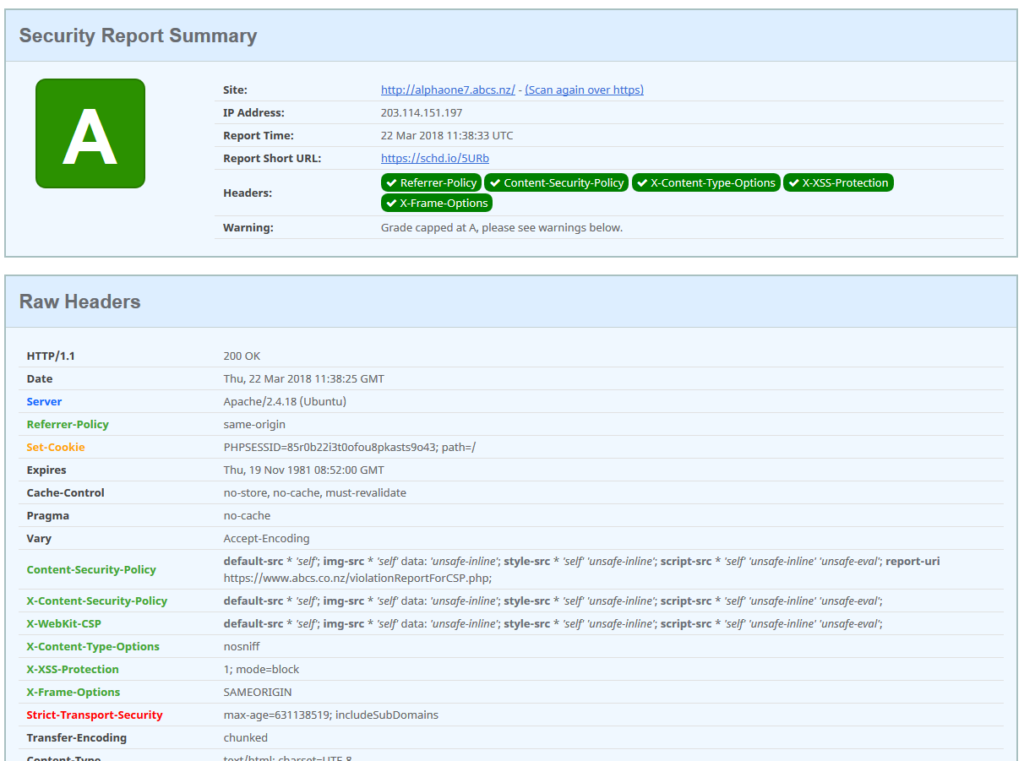
[securityheaders.io] Getting an "A"
Posted: 22 Mar 2018, 11:29am - Thursday# # to apply this settings, you must enable apache headers first... # e.g.: a2enmod headers # # headers customised by camilo3rd | 2018-03-22 ---- [start] # Header unset Content-Security-Policy #Header add Content-Security-Policy "default-src 'self'" Header add Content-Security-Policy "default-src * 'self'; img-src * 'self' data: 'unsafe-inline'; style-src * 'self' 'unsafe-inline'; script-src * 'self' 'unsafe-inline' 'unsafe-eval'; report-uri https://www.abcs.co.nz/violationReportForCSP.php;" Header unset X-Content-Security-Policy #Header add X-Content-Security-Policy "default-src 'self'" Header add X-Content-Security-Policy "default-src * 'self'; img-src * 'self' data: 'unsafe-inline'; style-src * 'self' 'unsafe-inline'; script-src * 'self' 'unsafe-inline' 'unsafe-eval';" Header unset X-WebKit-CSP #Header add X-WebKit-CSP "default-src 'self'" Header add X-WebKit-CSP "default-src * 'self'; img-src * 'self' data: 'unsafe-inline'; style-src * 'self' 'unsafe-inline'; script-src * 'self' 'unsafe-inline' 'unsafe-eval';" Header always set Referrer-Policy "same-origin" Header set X-Content-Type-Options "nosniff" Header set X-XSS-Protection "1; mode=block" #Header set X-Frame-Options "DENY" Header set X-Frame-Options SAMEORIGIN Header set Strict-Transport-Security "max-age=631138519; includeSubDomains" # # headers customised by camilo3rd | 2018-03-22 ---- [end] #Then save.. Restart your apache and that's it. You should get an A score.
 To understand those statements above especially the values, please refer to:
- https://developers.google.com/web/fundamentals/security/csp/
- https://content-security-policy.com/
Manage Apache Download Speed and Traffic Limits
Posted: 13 Jun 2012, 22:36pm - Wednesday- Install Apache Development libraries by casting "yum -y install apache-devel"
- Download "mod_cband" from http://dembol.org/blog/mod_cband/ or direct download link at http://dembol.org/downloads/cband/mod-cband-0.9.7.5.tgz
cd ~
wget http://dembol.org/downloads/cband/mod-cband-0.9.7.5.tgz
tar xzvf mod-cband-0.9.7.5.tgz
cd mod-cband-0.9.7.5
./configure
make
make install
To check if successfully installed, type just like below and must have same result:
[root@localhost ~]# cat /etc/httpd/conf/httpd.conf | grep mod_cband.so
LoadModule cband_module       /usr/lib/httpd/modules/mod_cband.so
Then add the code below at httpd.conf then save and restart apache.
CBandScoreFlushPeriod 1
CBandRandomPulse On
Next is add a "scoreboard"
mkdir /var/www/scoreboard
chown apache:apache /var/www/scoreboard/
Final steps is create an vhost entry at /etc/httpd/conf.d just like this (in my case, I created cband.com as my vhost);
[root@localhost conf.d]# cat cband.com.conf
<VirtualHost *:80>
    ServerAdmin webmaster@cband.com
    DocumentRoot /home/cband.com/public_html
    ServerName cband.com
    CBandSpeed 1024 10 30
    CBandRemoteSpeed 50kb/s 3 3
    CBandLimit 500M
    CBandExceededSpeed 128 5 15
    CBandScoreboard /var/www/scoreboard
    CBandPeriod 4W
    CBandExceededURL http://cband.com/exceeded.html

    <Location /cband-status>
      SetHandler cband-status
    </Location>
    <Location /cband-status-me>
      SetHandler cband-status-me
    </Location>

    ErrorLog logs/cband.com-error_log
    CustomLog logs/cband.com-access_log common
</VirtualHost>

[root@localhost conf.d]#
After you created the vhost file, restart your apache.
You can check the status of certain vhost by accessing the URL: http://cband.com/cband-status
or another status URL: http://cband.com/cband-status-me
Further Explanation:
- CBandSpeed 1024 10 30 -- Overall apache performance. Max bandwidth speed is 1024bits per secs. 10 requests per secs. 30 max connections
- CBandRemoteSpeed 50kb/s 3 3 -- Individual apache performance. Max bandwidth speed is 50kb/s, max 3 requests/s and max 3 connections
- CBandLimit 500M -- 500MB max bandwidth limit
- CBandExceededSpeed 128 5 15 -- Bandwidth speed limit at 128kbps, 5 request/s and max of 15 connections
- CBandScoreboard /var/www/scoreboard -- scoreboard location
- CBandPeriod 4W - time to refresh
- CBandExceededURL http://cband.com/exceeded.html -- if bandwidth exceeded, redirect to the specified URL.
You can use the following units in the mod_cband directives:

Transfer speeds:

    kbps: 1024 bits per second
    Mbps: 1024*1024 bits per second
    Gbps: 1024*1024*1024 bits per second
    The default is kbps.

Transfer quotas:

    K: 1000 bytes
    M: 1000*1000 bytes
    G: 1000*1000*1000 bytes
    Ki: 1024 bytes
    Mi: 1024*1024 bytes
    Gi: 1024*1024*1024 bytes
    The default is K.

Time periods:

    S: seconds
    M: minutes
    H: hours
    D: days
    W: weeks
    The default is S.
Reference:
Download mod_cband file:
- [download id="30"]
- http://dembol.org/downloads/cband/mod-cband-0.9.7.5.tgz
Load Balancing in Windows XP
Posted: 11 Jul 2011, 18:34pm - Monday- 2 NICs
- REGEDIT
System Key: [HKEY_LOCAL_MACHINE\SYSTEM\CurrentControlSet\Services\NetBT\Parameters] Value Name: RandomAdapter Data Type: REG_DWORD (DWORD Value) Value Data: (0 = disabled, 1 = enabled) Reference: http://www.pctools.com/guides/registry/detail/951/
CEntOS: Securing FTP (vsftpd) and SSH
Posted: 8 May 2010, 23:13pm - Saturdaychroot_local_user=YES chroot_list_enable=YES chroot_list_file=/etc/vsftpd.chroot_listedited /etc/vsftpd.chroot_list: add users only that DO NOT NOT NOT NOT get chrooted. use /sbin/nologin edited /etc/passwd entry for ftpuser:
ftpuser:X:#:#:FTP User Account:/home/ftpuser/./:/sbin/nologin------------
chroot_local_user=YES
chroot_list_enable=YES
means that by default ALL users get chrooted except users in the file
chroot_local_user=NO
chroot_list_enable=YES
means that by default ONLY users in the file get chrooted. See the difference? Article by: JordanH Final Configuration:
pam_service_name=vsftpd
userlist_enable=YES
tcp_wrappers=YES

chroot_local_user=YES
chroot_list_enable=YES
chroot_list_file=/etc/vsftpd/chroot_list

pasv_enable=YES
port_enable=NO
pasv_min_port=60000
pasv_max_port=64000

# ftp settings
connect_from_port_20=YES

# User Settings
pasv_promiscuous=YES
dirlist_enable=YES
download_enable=YES
SECURING SSH Edit /etc/ssh/sshd_config and at the bottom of the file, add these lines...
# Allowed users to login SSH
#AllowUsers root user002
# Disallow users in logging in at SSH
#DenyUsers user001
How to resize a partition in Windows Vista
Posted: 8 Mar 2009, 15:13pm - Sunday


6) Click on Extend Volume or Shrink Volume to extend or shrink the selected partition.
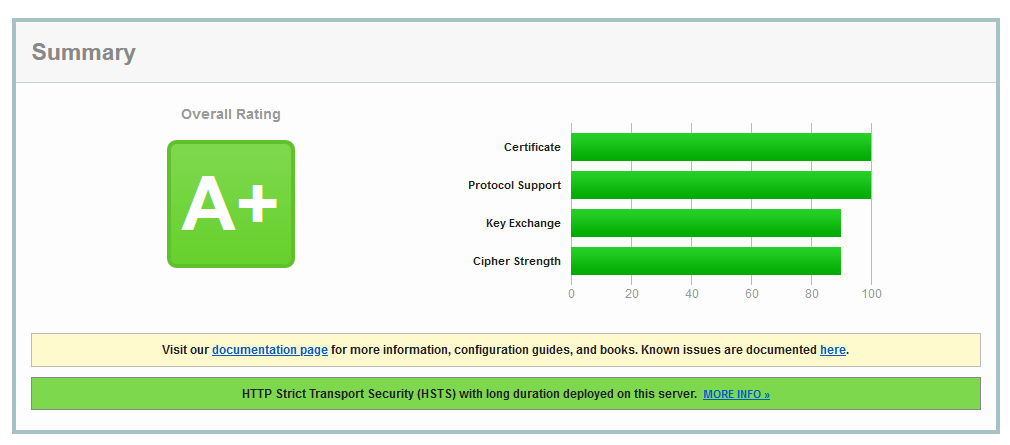
Reference: http://www.vistarewired.com[ssllabs.com] How to get “A+” on SSL Server test as of "Feb 2021"
Posted: 23 Feb 2021, 5:02am - TuesdayIt's been a while I haven't checked my server with latest configuration with SSL stuff. When I did, I got B. So today, I make my SSL in my server great again! lol
So how I did it...
a2endmod headers
Make sure you enable the headers for the "Strict-Transport-Security"
Then next is edit your ssl.conf, currently my server is not Ubuntu 20.04LTS, not using CentOS 7.x anymore due to work related getting used to it. So in Ubuntu, the config file is located at: /etc/apache2/mods-available/ssl.conf
        #SSLCipherSuite HIGH:!aNULL
        SSLCipherSuite "EECDH+ECDSA+AESGCM EECDH+aRSA+AESGCM EECDH+ECDSA+SHA384 EECDH+ECDSA+SHA256 EECDH+aRSA+SHA384 EECDH+aRSA+SHA256 EECDH EDH+aRSA !CAMELLIA !SEED !3DES !RC4 !aNULL !eNULL !LOW !MD5 !EXP !PSK !SRP !DSS"

        #SSLProtocol all -SSLv3
        SSLProtocol TLSv1.2
        SSLCompression off
        SSLHonorCipherOrder on

        SSLUseStapling          on
        SSLStaplingResponderTimeout 5
        SSLStaplingReturnResponderErrors off
        SSLStaplingCache        shmcb:/var/run/ocsp(128000)

        # Header always set Strict-Transport-Security
        Header always set Strict-Transport-Security "max-age=15552000; includeSubDomains; preload"
So that's it, you'll get A+ for that coz I did! :) Cheers!
Implemented on my personal projects:
zsh -> grml
Posted: 18 Nov 2019, 1:09am - Monday$ sudo apt install -y zshdownload grml's zsh configuration
$ cd ~/; wget -O .zshrc https://git.grml.org/f/grml-etc-core/etc/zsh/zshrcthen run zsh
$ zshthat's it.. will look like this:
 also you can make zsh-grml shell as default:
chsh -s /bin/zshor
camilord@camilo3rd-ubuntu /srv/localhost/alpha1v1 (git)-[3508-fixing-unit-test] % chsh
Password:
Changing the login shell for camilord
Enter the new value, or press ENTER for the default
	Login Shell [/bin/bash]:
iPhone Process List
Posted: 26 Nov 2013, 22:00pm - TuesdayThe list below are iPhone process list, you can check them one by one for disable or enable these iPhone Service or not. Launchd: takes over many tasks from cron, xinetd, mach_init, and init, which are UNIX programs that traditionally have handled system initialization, called systems scripts, run startup items, and generally prepared the system for the user. (do not close) TQServer: Net Long Company PC Suit daemon (recommend not to close it) BTServer: Bluetooth Service (BlueTooth) (in my environment with the dock, turn it off iphone not responding) CommCenter: Communications Center (phone system) (do not close) configd: to automatically configure and maintain the network (do not close) cron: regularly scheduled command or script execution (alarm clock might use it, recommend not to close it) mDNSResponder: Multicast-DNS Responder daemon. (Do not turn off) lockdownd: so that iPhone can use other SIM card (do not close) ptpd: the process of connecting itunes (do not close) fitx: WeFIT Input Method (not recommended to be closed) mediaserverd: (system sounds) (do not close) notifyd: inter-process communication (do not close) SpringBoard: Springboard is no better explanation in English, if you used the installer or ibrickr install a third-party software, you will find the middle of the screen there is a circular symbol loader, and then immediately return to the standby screen iPhone , then this is a Springboard restart the process (do not close) MobilePhone: I need not explain this right (do not close) sshd: ssh daemon (you can close it) crashreporterd: test application crashes the daemon. (Recommend to close) dock: dock the software process (you decide to use or not) iapd: ipod is the iphone and other Apple products using a communication protocol, the purpose is to allow other third-party devices such as communication equipment and iphone. (Recommended closure) syslogd: recording system error logs and status messages (recommend to close) update: time to refresh the file system cache to prevent data loss caused by system crash (recommend to close). If you want to manually sync the file system cache, in text mode (ssh to connect to the iphone), implementation of the sync command. crashreporterd, iapd, syslogd, update service can be safely shut down and will not impact on the system. fitx memory for not a lot of information needs to hand in the hair starts, so I do not recommend turning off.
Processes:  38 total, 1 running, 1 stuck, 36 sleeping... 201 threads                                                                                                                                                                 13:55:28
Load Avg:  1.83,  1.18,  0.99    CPU usage:  4.63% user,  0.00% sys, 95.37% idle
SharedLibs: num =    0, resident =     0 code,     0 data,     0 linkedit.
MemRegions: num =     0, resident =     0 +     0 private,     0 shared.
PhysMem:   57M wired,   96M active,   50M inactive,  291M used,  214M free.
VM: 11G + 0   27721(0) pageins, 0(0) pageouts

  PID COMMAND      %CPU   TIME   #TH #PRTS #MREGS  RPRVT  RSHRD  RSIZE  VSIZE
  750 top          2.8%  0:00.09   1    21      0      0      0  1184K+  267M
  746 bash         0.0%  0:00.04   1    16      0      0      0  1060K   268M
  745 sshd         0.1%  0:01.04   1    18      0      0      0  1428K   268M
  691 bash         0.0%  0:00.10   1    16      0      0      0  1088K   268M
  690 sshd         0.0%  0:01.16   1    18      0      0      0  1420K   268M
  395 Bump         0.0%  0:01.21  11    66      0      0      0  9604K   340M
  374 MobileMail   0.0%  0:02.55  10   128      0      0      0  8836K   343M
  309 LINE         0.0%  0:23.51  11   192      0      0      0    42M   413M
  271 MobilePhon   0.0%  0:01.98   5    82      0      0      0  6512K   339M
  210 networkd     0.0%  0:00.52   3    50      0      0      0  1068K   269M
  139 myTunes      0.0%  0:01.18   1    10      0      0      0   372K   277M
  127 notifyd      0.0%  0:03.19   4   115      0      0      0  1028K   270M
   73 aosnotifyd   0.0%  0:00.79   4    70      0      0      0  3504K   297M
   72 BTServer     0.0%  0:00.82   3    62      0      0      0  1992K   271M
   71 CommCenter   0.0%  0:12.08  11   214      0      0      0  3420K   284M
   66 SpringBoar   0.2%  1:43.16  20   555      0      0      0    41M   436M
   65 aggregated   0.0%  0:05.62   4    44      0      0      0  1984K   298M
   64 apsd         0.0%  0:01.62   3    86      0      0      0  1780K   287M
   63 assistivet   0.0%  0:01.30   6    68      0      0      0  6240K   333M
   58 configd      0.0%  0:09.70   9   220      0      0      0  2540K   272M
   55 dataaccess   0.0%  0:21.93  11   127      0      0      0  8092K   304M
   54 fairplayd.   0.0%  0:01.84   2    62      0      0      0  3568K   277M
   53 fseventsd    0.0%  0:02.03   4    25      0      0      0   988K   268M
   51 iapd         0.0%  0:01.73   4    94      0      0      0  3348K   289M
   50 imagent      0.0%  0:02.17   4    89      0      0      0  2392K   298M
   48 locationd    0.1%  1:18.24  13   182      0      0      0  7644K   307M
   47 mDNSRespon   0.0%  0:01.51   3    46      0      0      0  1488K   269M
   46 mediaremot   0.0%  0:00.30   3    48      0      0      0  1576K   269M
   45 mediaserve   0.0%  0:04.15  17   265      0      0      0  7160K   304M
   39 lockdownd    0.0%  0:08.90   2    63      0      0      0  2268K   288M
   32 powerd       0.0%  0:08.65   3    62+     0      0      0  1052K+  287M+
   30 syslogd      0.0%  0:01.36   4    58      0      0      0   628K   268M
   26 wifid        0.0%  0:08.63   4   106      0      0      0  2064K   288M
   25 sbsettings   0.0%  0:00.20   2    28      0      0      0  2308K   287M
   24 callblocke   0.0%  0:00.59   2    33      0      0      0  2860K   296M
   22 myTunes      0.0%  0:00.01   1    16      0      0      0   332K   258M
   21 UserEventA   0.0%  0:19.29   9   147      0      0      0  2756K   291M
    1 launchd      0.0%  0:04.99   3   292      0      0      0  1016K   268M
---
Reference: http://blog.iobit.com/iphone-process-list_4008.htmlGambas 2.x in Ubuntu
Posted: 12 Aug 2011, 16:49pm - Friday

- Installing GAMBAS 2.x in Ubuntu
So after installation, as a first app -- the "Hello World!". so I start creating a new project and test typing lil' codes. Coding results below;
[caption id="attachment_574" align="aligncenter" width="576" caption="GAMBAS First App"]
 [/caption]
Conclusion: GAMBAS is just like MS Visual Basic with some little differences in coding. Hope GAMBAS will be fully developed and become mature, with this Linux Desktop Application Developer will raise (and I want to be one of the developers! hahahaha...).
Comments: I like GAMBAS.. so cute! hahahahaha... want to explore more about this software.
For more information about GAMBAS, please visit http://gambas.sourceforge.net/en/main.html
IPTABLES - Logging and dropping traffic in a single rule
Posted: 15 Jul 2010, 20:00pm - ThursdayThe second rule flushes the contents of the chain, again, so that if you run it twice on the same system you don't have duplicate rules in the chain. The third rule LOGS the traffic with the added "LOGDROP" prefix and the fourth rule DROPs the traffic What this now means is that you can easily log and drop traffic or even log and accept traffic (with minor modifications to the above), by creating a rule such as this:# Create the LOGDROP chain iptables -N LOGDROP > /dev/null 2> /dev/null iptables -F LOGDROP iptables -A LOGDROP -j LOG --log-prefix "LOGDROP " iptables -A LOGDROP -j DROPThe first rule in this set creates the new chain. The output is sent to /dev/null because if you attempt to run this twice on the same system, you will get an error saying the chain already exists. It's up to you if you want to see that message or not.
If anyone has any comments or corrections for this, please let me know using the comment system below. Article From: http://www.techbytes.ca/techbyte136.html# Log and drop all connections to the HTTP port iptables -A INPUT -p tcp --dport 80 -j LOGDROPAs you can see, you now simply use the LOGDROP target in order to log and drop any traffic you want. You must ensure that you define the LOGDROP target BEFORE you attempt to use it in a rule.
Ubuntu Professional Certification
Posted: 18 Dec 2009, 22:11pm - Friday [/caption]
Today, I tried to answer the pre-test of UPC or the Ubuntu Professional Certification... and the result was...
[/caption]
Today, I tried to answer the pre-test of UPC or the Ubuntu Professional Certification... and the result was...
Dear Camilo III, Thank you very much for taking part in the pre-training assessment. Your score is 9, which means that you are probably over-qualified for this course. As a next step we suggest that you read through the Deploying Ubuntu Server Edition course overview found here: http://www.ubuntu.com/training/certificationcourses/server and then complete the corresponding online assessment. Ubuntu Training courses are taught by Canonical-trained Ubuntu Certified Instructors. The Deploying Ubuntu Server Edition course is available through online training and classroom training, so you can can learn in the environment that suits you best. Visit: www.ubuntu.com/training for more information. Best regards and good luck The Ubuntu Training TeamHow flattering!! I admit it, I'm not that good... but anyway, the test is so easy.. hahahaha.. :) And one thing, I don't have a dollars to pay the $1,600 for the Deploying Ubuntu Server Edition Certification. Its like PhP 76,800.00 in my country, that is 9 months to save my whole salary. hahahaha.. Damn! I will starved to death if I will take the exam... :P